Getting Started with ASP.NET MVC Core and .NET 5
In this article, we are going to create a simple ASP.NET MVC Core Web Application using Visual Studio 2019 and .Net 5. We will also add controller, action method, MVC view with Model binding.
.NET 5 is the new unified platform to develop .NET Framework or .NET Core applications. .NET 5 has merged .NET Framework and .NET core. Microsoft has stopped any new feature for .NET Framework. For more details visit new features of .NET 5.
To complete code from this blog you need Visual studio 16.8 for windows and mac users.
Steps to create Core MVC Web application with .NET5
-
Create ASP.NET Core MVC application
Assuming you have Visual Studio 16.8 installed on your machine. Open Visual Studio 2019 and search for the template ASP.NET Core Web application. This will show you multiple templates using that you can create a web application. As .NET5 is a unified platform template for .NET Core as well as .NET Framework are shown..
Select a template having the name ASP.NET Core Web application and tag as C# as shown in the following picture.
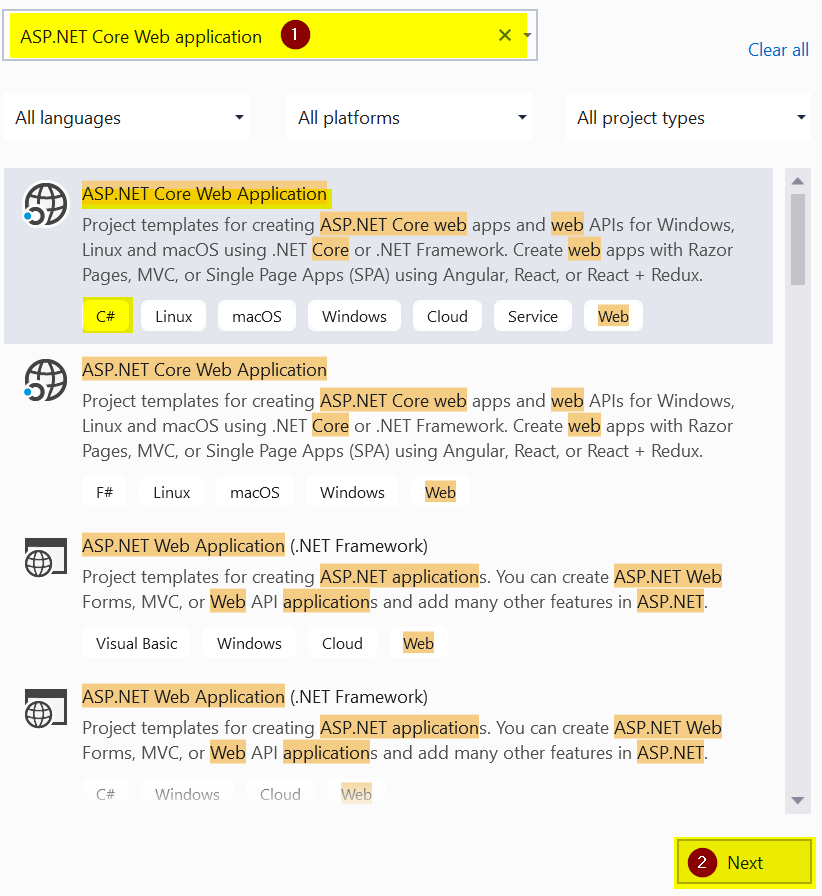
Click on the Next button to configure your project.
On the next screen Configure your new project enter Project Name as MVC5Tutorial, provide the Location where you wish to save your web application, and click on the Create button.
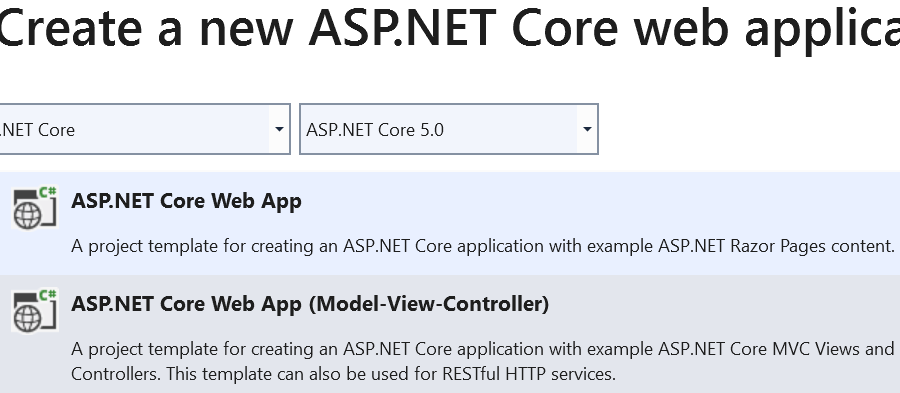
Next, create a new ASP.NET Core Web Application dialogue box select .Net Core and ASP.NET Core 5.0 from dropdowns.
Select ASP.NET Core Web App(Model View Controller) template, make sure Configure for Https checkbox is selected and then click on Create.
Your Web application is created with default files.
The visual studio creates a default configuration, controller, and views for you to run your application without making any changes to it. You can run your application and see the output by pressing F5.
-
ASP.NET Core MVC App File Structure
Open solution explorer from the right side of Visual Studio. If it is not there you can open it from the View menu and examine the project default file structure.
The project file structure is well organized into Models, Controller, and Views folders. Following are few important files.
-
LaunchSettings.json
Open solution explorer and click on Properties folder to view this file. The settings from this file only used in the development environment. It is not going to be part of publish package for production.
-
wwwroot
is a default web root directory used to save static files like images, CSS, JavaScript. These files can directly be accessed by {content root}/wwwroot or using domain name like http://<domainname>/site.css. You can compress these files using IIS configuration settings for httpcompression.
-
Controllers
is responsible for controlling the way that a user interacts with an MVC application. Default controllers folder has HomeController having action methods for Index, Privacy and Error.
-
Models
The Model should contain all of your business rule validations, validation logic or database logic, EF classes. You can generate Model and DBContext classes using EF Core code first migration. The default Models directory has ErrorViewModel model to display exception details on the Error view page.
-
Views
A view is a component involved in the application user interface. This displays the required data or collects data from users. The default folder has views related to the Home controller, partial views, layout pages.
-
appsettings.json
It is an application configuration setting file used to store configuration settings such as database connection strings, environment-specific keys, file paths, etc. The default appsettings.json file has settings related to logging..
-
Program.cs
This file has the following method that is an entry point of any ASP.NET Core application. This application is actually a Console project that gets started by executing the Main method. You can configure the Kestrel server and reverse proxy in the Main method. For more information on Kestrel Server settings visit ASP.NET Core Kestrel Server settings.
public static void Main(string[] args) { var host = new WebHostBuilder() .UseKestrel() .UseContentRoot(Directory.GetCurrentDirectory()) .UseIISIntegration() .UseStartup() .Build(); host.Run(); } -
Startup.cs
ASP.NET core Web application must have StartUp.cs file. This file is like Global.asax file. This file has two methods ConfigureServices used to register services to IoC container and Configure used to configure application request pipeline using IApplicationBuilder instance.
-
-
Add Area to ASP.NET Core MVC app
ASP.NET Core Area is a logical grouping of your application module. Using Area you can partition ASP.NET Core web app in smaller groups, each group will have its own set of Views, Controllers, Models, etc. For example, for any organization application, you will have Area for Employee, Department, Payroll, etc.
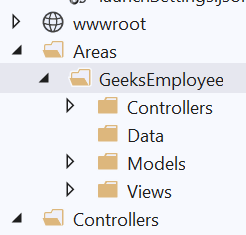
To add a new Area, Right Click on application name from solution explorer -> Select Add -> Select New Scaffolded Item -> select MVC Area from middle pane of dialog box -> Enter Name GeeksEmployee -> Click Ok. Learn more about areas - How to use ASP.NET Core MVC Area.
This will create GeeksEmployee Area as shown below picture.
For routing requests related to Area, you will have to create a route for it. Open Startup.cs file and update code for routing in Configure method as shown.
app.UseEndpoints(endpoints => { endpoints.MapControllerRoute( name: "areas", pattern: "{area:exists}/{controller=Home}/{action=Index}/{id?}" ); endpoints.MapControllerRoute( name: "default", pattern: "{controller=Home}/{action=Index}/{id?}"); }); -
Add Model to ASP.NET Core MVC App
In this step, you will add a Model to GeeksEmployee Area. This model will be responsible to hold data, validate business rules using Data Annotation.
From solution explorer select Areas -> GeeksEmployee -> Models -> Click Add -> New Item -> Select Class -> Enter name as EmployeeModel.cs Click Add.
This adds the Employee model to the Models folder of the GeeksEmployee Area.
Add the following code to EmployeeModel.cs file.
namespace MVC5Tutorial.Areas.GeeksEmployee.Models { public class EmployeeModel { [Required(ErrorMessage = "Employee ID is required")] public int EmployeeID { get; set; } [StringLength(10, ErrorMessage = "The length of First Name should be less than or equal to five characters.")] public string FirstName { get; set; } public string LastName { get; set; } [Required(ErrorMessage = "Location is required")] public string Location { get; set; } [DataType(DataType.EmailAddress, ErrorMessage = "Email is not valid.")] [RegularExpression(@"^\w+([-+.']\w+)*@\w+([-.]\w+)*\. \w+([-.]\w+)*$", ErrorMessage = "Email is not valid.")] public string Email { get; set; } } } -
Add Controller to ASP.NET Core MVC app
In this step, you will add GeeksEmployee controller to accept requests related to employee and process these requests. This controller will have Action methods.
To Add a new controller from solution explorer Select Areas -> Select <Area Name> -> right click on Controllers folder -> Select Add -> Controller -> From Add New Scaffolded Item dialogue box middle pane select MVC Controller Empty -> click Add -> Enter Name as GeeksEmployee -> Click Add.
GeeksEmployee controller is added to Area.
You already have created a route for Areas. For GeeksEmployee controller you need to mention the Area name and route as shown in following code. Notice [Area] and [Route] attributes.
namespace MVC5Tutorial.Areas.GeeksEmployee.Controllers
{
    [Area("GeeksEmployee")]
    [Route("/GeeksEmployee")]
    public class GeeksEmployee : Controller
    {
        public IActionResult Index()
        {

        }
    }
}
You can use EmployeeModel created in the previous step to bind data and display it on View. Update Index action method from GeeksEmployee with the following code.
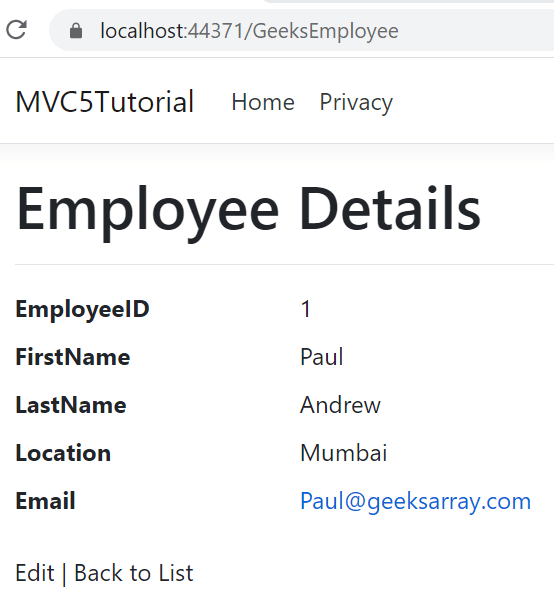
public IActionResult Index() { EmployeeModel employee = new EmployeeModel() { EmployeeID = 1, FirstName = "Paul", LastName = "Andrew", Location = "Mumbai", Email = "Paul@geeksarray.com" }; return View(employee); } -
Add View to ASP.NET Core MVC App
To display Employee model values on the browser you need Views. Views can display data from models, inline values, or plain text. The view can have multiple Partial Views, it can use layout views.
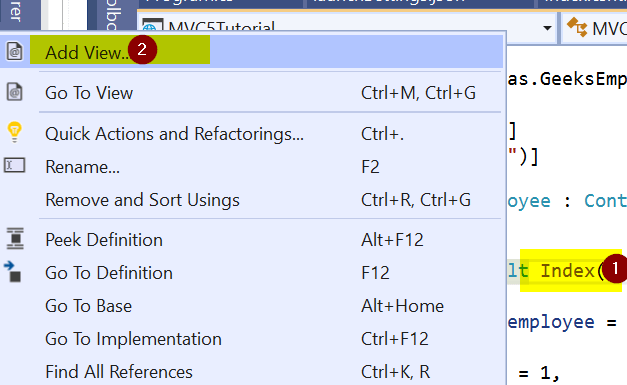
To add View to display data written in Index method of GeeksEmployee controller, right click on Index action methond -> from context menu select Add View -> select Razor View - Empty.
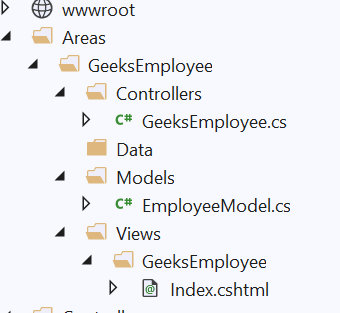
This will add Index.cshtml file to Areas / GeeksEmployee / Views / GeeksEmployee directory. Following will be the file structure of your GeeksEmployee Area.
Add following code to Index.cshtml
@{
    ViewData["Title"] = "Index";
    Layout = "~/Views/Shared/_Layout.cshtml";
}

@model MVC5Tutorial.Areas.GeeksEmployee.Models.EmployeeModel

<h1>Welcome from Employee Controller</h1>

<div>
<h4>Employee</h4>
<hr />

    <dl class="row" >
        <dt class="col-sm-2" >
            @Html.DisplayNameFor(model=> model.EmployeeID)
        </dt>
        <dd class="col-sm-10" >
            @Html.DisplayFor(model=> model.EmployeeID)
        </dd>
        <dt class="col-sm-2" >
            @Html.DisplayNameFor(model=> model.FirstName)
            </dt>
        <dd class="col-sm-10" >
            @Html.DisplayFor(model=> model.FirstName)
            </dd>
        <dt class="col-sm-2" >
            @Html.DisplayNameFor(model=> model.LastName)
            </dt>
        <dd class="col-sm-10" >
            @Html.DisplayFor(model=> model.LastName)
            </dd>
        <dt class="col-sm-2" >
            @Html.DisplayNameFor(model=> model.Location)
            </dt>
        <dd class="col-sm-10" >
            @Html.DisplayFor(model=> model.Location)
        </dd>
        <dt class="col-sm-2" >
            @Html.DisplayNameFor(model=> model.Email)
        </dt>
        <dd class="col-sm-10" >
            @Html.DisplayFor(model=> model.Email)
        </dd>
    </dl>
</div>

<div>
    <a asp-action="Edit" asp-route-id="@Model.EmployeeID" >Edit</a> |
    <a asp-action="Index" >Back to List </a>
</div>
This uses _Layout.cshtml file as layout and Employee Model as a model.
You can run the application by pressing F5. Redirect your browser to localhost:<port number>/geeksemployee. This will show output as.

Blog Search
