Entity Framework Core Code First Migration Using Separate Assembly
This blogpost explains how to achieve Entity Framework code first migrations having Models, DBContext, and Model Snapshot files in assembly different than web or startup projects.
By following this tutorial you will create a Class library project, data models with DataAnnotations validation, ApplicationContext class implementing DBContext, and implement IDesignTimeDbContextFactory to avoid the use of startup class.
Steps to create Category, Product Data Model, DBContext and implement IDesignTimeDbContextFactory interface.
-
Create a .NET Core Class Library
From Visual Studio File Menu -> Click on New Project
From left the pane of New Project dialog box select Visual C# or Visual Basic -> .NET Core
Then from middle pane select Class Library(.NET Core)
Give a name to the project of your choice or GeeksStoreDataAccess
You may remove Class1.cs file. -
Create Data Model
Add a new folder with name DataModels under the root of the GeeksStoreDataAccess project.
Now in this step, you will add Category.cs and Product.cs for respective data models.
Right Click on DataModels folder -> Select Add -> Class.
Give class name as Category.cs and click ok.Category data models will be used to a create Category table in SQL database. Add columns for the Category table as shown below using properties. You can generate models from existing database for all tables using EF Core Database first approach.
namespace GeeksStoreDataAccess.DataModels
{
    public class Category
    {
        public Category()
        {

        }

        public int CategoryID { get; set; }

        public string CategoryName { get; set; }
        public string Description { get; set; }

        public virtual List<Products> Products { get; set; }
    }
}
Similarly, create a Product data model by creating a new class with the name Product.cs.
Add below properties to Products.cs file to create Product table and its columns.namespace GeeksStoreDataAccess.DataModels { public class Product { public Product() { } public int ProductID { get; set; } public string ProductName { get; set; } public int CategoryID { get; set; } public int QuantityPerUnit { get; set; } public decimal UnitPrice { get; set; } public int UnitsInStock { get; set; } public int ReorderLevel { get; set; } public bool Discontinued { get; set; } public virtual Category Category { get; set; } } }Notice Category column from Products and Products column from Category class, it indicates One to Many relationships between Category and Products table.
-
Add EntityFrameworkCore Nuget Package
In this step, you will add required NuGet packages to run EntityFramework Core.
Microsoft.EntityFrameworkCore for using DbContext, DbSet etc.
Microsoft.EntityFrameworkCore.Sqlserver for using SQL Server with DbContextOptionsBuilder.
Microsoft.EntityFrameworkCore.Tools for using Migration related commands. Microsoft.Extensions.Configuration.FileExtensions for accessing appsettings.json or other config files.Open the NuGet Package Manager console and execute the below commands in sequence.
install-package Microsoft.EntityFrameworkCore
install-package Microsoft.EntityFrameworkCore.Sqlserver
install-package Microsoft.EntityFrameworkCore.Tools
install-package Microsoft.Extensions.Configuration.FileExtensions
-
Creating ApplicationContext using DBContext
DBContext is the main entry point of EntityFramework which allows you to manage database connection, configure data models and their relationship, query tables, making DML operations on data, caching, etc.
Add a new class to your class library project with the name StoreContext.
Create a constructor for StoreContext class having DbContextOptions injected in it.
public class StoreContext : DbContext { public StoreContext(DbContextOptionsoptions) : base(options) { } } If you want to configure Domain Models you can use the OnModelCreating method. Models can be configured with DataAnnotations or Fluent API. In this tutorial, you will use DataAnnotations to implement validation or relationships.
Create DBSet type properties for Products and Category classes to create tables and perform CRUD operations. Context class must use DBSet type properties for the entities which map database tables and views.
Add below code in StoreContext.cs file.
public DbSet<Category> Categories { get; set; } public DbSet<Product> Products { get; set; } -
Add appsettings.json file
The purpose of using appsettings.json is only to add SQL server connection string or other required configuration that can be used in the DesignTimeDbContextFactory class.
Right click on GeeksStoreDataAccess Class library project -> Select Add -> New Item -> Select Web from left pane -> Select JavaScript JSON Configuration File from middle pane -> name it appsettings.json -> click Ok.
Add your connection string to appsettings.json with the below configuration setting.
{ "ConnectionStrings": { "DefaultConnection": "<your server name>Catalog=GeeksStore; Integrated Security=True;Connect Timeout=30;Encrypt=False; TrustServerCertificate=False;ApplicationIntent=ReadWrite; MultiSubnetFailover=False" } } -
Implement IDesignTimeDbContextFactory<ApplicationContext> in Class Library
To avoid reference to Entity Framework in your web or start up project, you will have to implement the IDesignTimeDbContextFactory interface in your Data Access project.
CreateDbContext method of IDesignTimeDbContextFactory interface will create required configuration and returns ApplicationContext.
Create a new class with name DesignTimeDbContextFactory.cs and inherit IDesignTimeDbContextFactory interface. Implement method CreateDbContext with code as below and add required references.
using Microsoft.EntityFrameworkCore; using Microsoft.EntityFrameworkCore.Design; using Microsoft.Extensions.Configuration; using System.IO; public class DesignTimeDbContextFactory : IDesignTimeDbContextFactory<StoreContext> { public StoreContext CreateDbContext(string[] args) { IConfigurationRoot configuration = new ConfigurationBuilder() .SetBasePath(Directory.GetCurrentDirectory()) .AddJsonFile("appsettings.json") .Build(); var builder = new DbContextOptionsBuilder<StoreContext>(); var connectionString = configuration.GetConnectionString("DefaultConnection"); builder.UseSqlServer(connectionString); return new StoreContext(builder.Options); } } -
EFCore Add-Migration
Now you are all set to create your database with initial migration using Entity Framework code first.
Add-Migration command creates an initial set of tables using referred models. It creates a class file inherited by ModelSnapShot, this class defines column data types, table constraints, etc.
You might want to keep initial migration and subsequently updated migration to separate folder. Create a parent folder with name Migration and then create a subfolder with name as Initial.
Open NuGet Package Manager Console and execute the command
Add-Migration InitialCreate -OutputDir Migrations\initial
The database is not yet created, at this point only ModelSnapshot file is generated under Migration -> initial folder.
To create database use update-database -verbose command in PMC(package manager console) as shown below. This will actually create a database at the location mentioned in the connection string. -verbose is used to see details if there is an error otherwise it just shows build failed.
Update-Database -verboseYour database should be created now.
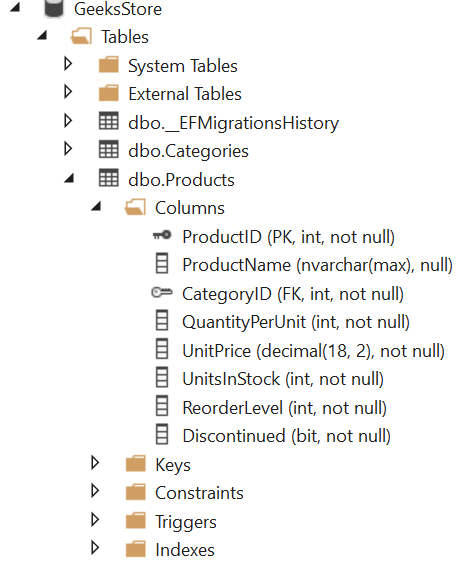
Notice the column has created with default data type and default length or primary key is created with no identity value. For managing column data type, constraints, identity value and other validations you may use DataAnnotations with Data Models or use Fluent API creating Data Models for Entity Framework code first.

Blog Search

-
Building Scalable Applications: Microservice Architecture Challenges
-
The Paradigm Shift to Low-Code and No-Code Development in Software Engineering
-
How To Use AutoMapper in ASP.NET Core Web API
-
Generate Log using Serilog And Seq In ASP.NET Core MVC 6
-
How to Setup CORS Policies in ASP.NET Core Web API