Generate Log using Serilog And Seq In ASP.NET Core MVC 6
This blog explains how to generate logs using Serilog, its feature like Sink, log level, JSONFormatter, Serilog Enricher, Output Templates, and analyze using Seq.
Serilog is a structured logging system that creates log messages and captures key attributes and data about the message's context. Serilog generates log messages as data, not just plain text. You can efficiently perform structured queries on these messages.
Create ASP.NET Core MVC application
For this tutorial, we will create an ASP.NET Core MVC 6 application and integrate Serilog into it.
Open visual studio and Create a new Console application from File -> New Project -> ASP.NET Core Web App (MVC) -> project name as ASPNETCoreMVCSerilog -> set location of your choice -> click on Next -> Select Framework as per Availability -> Click on Create. For more detailed steps visit Getting Started with ASP.NET Core MVC
For this tutorial, I am using .NET Core 6. You can use whatever is available for you, also you may create a Web API or Class library and follow the below steps.
-
Serilog Sink
Serilog sink specifies where log messages will be stored physically. Serilog provides multiple sinks to store logs in different formats. You can use one or multiple sinks to log messages.
Structured log events are written to sinks and each sink is responsible for writing it to its own backend, database, and physical store. The following are majorly used sinks with .NET Core applications.
- Email: To send logs over email.
- Elasticsearch: is a NoSQL search engine.
- File: Serilog writes log events to text, json or csv file.
- Seq: structured log server.
- MSSqlServer: writes log events to a SQL Server database table.
For full list of available sinks see Serilog Sinks
-
Install Serilog Nuget package
To integrate Serilog you need Nuget packages, depending on where you want to log messages. You can log messages to one or multiple Sinks like Console, File, and others as discussed in the previous step.
For this tutorial, we will use File and Seq sinks. So install the required NuGet packages.
- Serilog
- Serilog.AspNetCore
- Serilog.Sinks.File
- Serilog.Sinks.Seq
-
MinimumLevel
Serilog produces tons of data that may not use, logging all data will increase file size, increase CPU usage and degrade application performance. As a best practice, the appropriate log level should be used to control log size.
Using appropriate log levels helps manage log data. You can set any of the following MinimumLevel. Select as per your requirement.
- Verbose is used for anything and everything..
- Debug is used for internal system data like checking variable values or objects.
- Information informative log.
- Warning warnings like a slow database or query output.
- Error when any exception occurs.
- Fatal when showstopper error occurred in the application. The application can not be used and immediate action is required..
Messages will be created only for levels having more value than configured. For example if MinimumLevel is configured as Warning then only Warning, Error, Fatal level messages will be pushed to the configured sink.
-
Configure Serilog Logger instance
You can configure the Serilog Logger instance in two ways that is through dependency injection to .NET Core middleware or by using appsettings.
.NET Core Middleware
With this method Serilog instance is configured in Program.cs file.
The following code creates an instance of Serilog Logger and configures File and Seq sink. The file sink is configured to create log files under the logs folder of root with the name log-.txt. Its rollinginterval is set as daily. So log messages will be written to log-<today's date>.txt file.
Seq sink is configured on port 5341 so if you browse http://localhost:5341, you will see all logs.
MinimumLevel is set as Debug, so all levels of logs will be generated except Verbose.
var _logger = new LoggerConfiguration() .WriteTo.File("./logs/log-.txt", rollingInterval: RollingInterval.Day) .WriteTo.Seq("http://localhost:5341", Serilog.Events.LogEventLevel.Warning) .MinimumLevel.Debug() .CreateLogger(); builder.Logging.AddSerilog(_logger); var app = builder.Build();-
appsettings.json
You can configure Serilog and required sinks in appsettings.json file. Following code configures Serilog similar as the previous step.
appsettings.json
"Serilog": {
    "MinimumLevel": {
        "Default": "Information",
        "Override": {
        "Microsoft": "Warning",
        "Microsoft.Hosting.Lifetime": "Information"
        }
    },
    "WriteTo": [
    {
        "Name": "File",
        "Args": {
            "path": "./logs/log-.txt",
            "rollingInterval": "Day"
    }
    },
    {
        "Name": "Seq",
        "Application": "Geeks API",
        "Args": { "serverUrl": "http://localhost:5341" }
    }
    ]
}
Program.cs
builder.Host.UseSerilog((ctx, lc) => lc.ReadFrom.Configuration(ctx.Configuration)); -
Log Serilog Events
So far you have configured Serilog. Now you will actually use it in MVC controller. Open HomeController and create a Serilog instance as:
private readonly ILogger<HomeController> _logger;

public HomeController(ILogger<HomeController> logger)
{
    _logger = logger;
}
Add following code to Index Action Method, which actually logs messages to the File.
public IActionResult Index()
{
    _logger.LogInformation
        ("Index from HomeController called.");
}
Run your application, this create a folder with name logs, log file with name log-<todays date>.txt and write information log to the file.

-
Logging Complex object
With Serilog structured logging just as a plain text message, you can also log for complex object values. To test this add a model with the name Customer.
public class Customer
{
    public int CustomerID { get; set; }

    public string  CustomerName { get; set; } = string.Empty;
}
This code will log a message with the values of Customer complex object.
public IActionResult Index()
{
    _logger.LogInformation("Index from HomeController called");
    Customer customer = new Customer();
    customer.CustomerID = 1;
    customer.CustomerName = "Scott";
    _logger.LogInformation("Processing {@customer}", customer);

    return View();
}
Log generated
2022-09-22 20:31:24.838 -04:00 [INF] Index from HomeController called 2022-09-22 20:31:24.872 -04:00 [INF] Processing {"CustomerID":1,"CustomerName":"Scott","$type":"Customer"} -
Serilog Enrichers
Enricher adds specific content to every log message. You can enrich logs with systems like process id, HTTP request, environment variable, machine or username, or application related information like release number.
Serilog enrichers are part of following NuGet packages.
- Serilog.Enrichers.Environment
- Serilog.Enrichers.Process
- Serilog.Enrichers.Thread
Add enrichers using appsettings
"Serilog": {
"MinimumLevel": {
    "Default": "Information",
    "Override": {
    "Microsoft": "Warning",
    "Microsoft.Hosting.Lifetime": "Information"
    }
},
"WriteTo": [
    {
    "Name": "File",
    "Args": {
        "path": "./logs/log-.txt",
        "rollingInterval": "Day"
    }
    },
    {
    "Name": "Seq",
    "Application": "Geeks API",
    "Args": { "serverUrl": "http://localhost:5341" }
    }
],
"Enrich": [
    "FromLogContext",
    "WithMachineName",
    "WithProcessId",
    "WithThreadId"
    ]
}
Using code
var _logger = new LoggerConfiguration()
    .Enrich.FromLogContext()
    .Enrich.WithProcessId()
    .Enrich.WithProcessName()
    .WriteTo.File("./logs/log-.txt", rollingInterval: RollingInterval.Day)
    .CreateLogger();
Add Custom Property
With Serilog Enrichers you can also add custom properties as shown below. This code will add CustomerKey value with each log.
var _logger = new LoggerConfiguration()
    .Enrich.FromLogContext()
    .Enrich.WithProcessId()
    .Enrich.WithProcessName()
    .Enrich.WithProperty("CustomerKey", "ABC123")
    .WriteTo.File("./logs/log-.txt", rollingInterval: RollingInterval.Day)
    .CreateLogger();
outputTemplate
Enricher logs can be formatted using outputTemplate.
var _logger = new LoggerConfiguration()
    .Enrich.FromLogContext()
    .Enrich.WithProcessId()
    .Enrich.WithProcessName()
    .Enrich.WithProperty("CustomerKey", "ABC123")
    .Enrich.WithProperty("PID", Process.GetCurrentProcess().Id)
    .WriteTo.File("./logs/log-.txt", rollingInterval: RollingInterval.Day,
        outputTemplate:"{Timestamp:HH:mm:ss} {Message} {CustomerKey} {PID}{NewLine}{Exception}"
    )
    .CreateLogger();
Output generated as

-
UseSerilogRequestLogging
UseSerilogRequestLogging adds a summary of each request. It is part of Serilog.AspNetCore package. To include information of each request handled by ASP.NET Core include this line in program.cs file.
app.UseHttpsRedirection();
app.UseStaticFiles();

app.UseSerilogRequestLogging();

app.UseRouting();

app.UseAuthorization();
Log generated as
2022-09-24 14:08:42 [INF] Now listening on: https://localhost:7233 2022-09-24 14:08:42 [INF] Now listening on: http://localhost:5233 2022-09-24 14:08:42 [INF] Application started. Press Ctrl+C to shut down. 2022-09-24 14:08:42 [INF] Hosting environment: Development 2022-09-24 14:08:42 [INF] Content root path: \ASPNETCoreMVCSerilog\ 2022-09-24 14:08:49 [INF] HTTP GET / responded 200 in 1325.8486 ms -
Seq
Seq is one of the sinks where you can log your events. Seq provides excellent features for handling complex event data, enrichment, and structured events. You can query and read logged events just like you do in SQL.
Seq is free for individual use. To use you will have to install it on your machine or use a docker image. You can download and install Seq from Seq.
By default, Seq is configured on port 5431, as you already have generated logs so you can browse http://localhost:5341/ to see logged events.
Seq queries
You can query Seq logged events to filter events. The Seq interface has a search box where you can use predefined query syntax. For detailed syntax visit - Seq Query Syntax.
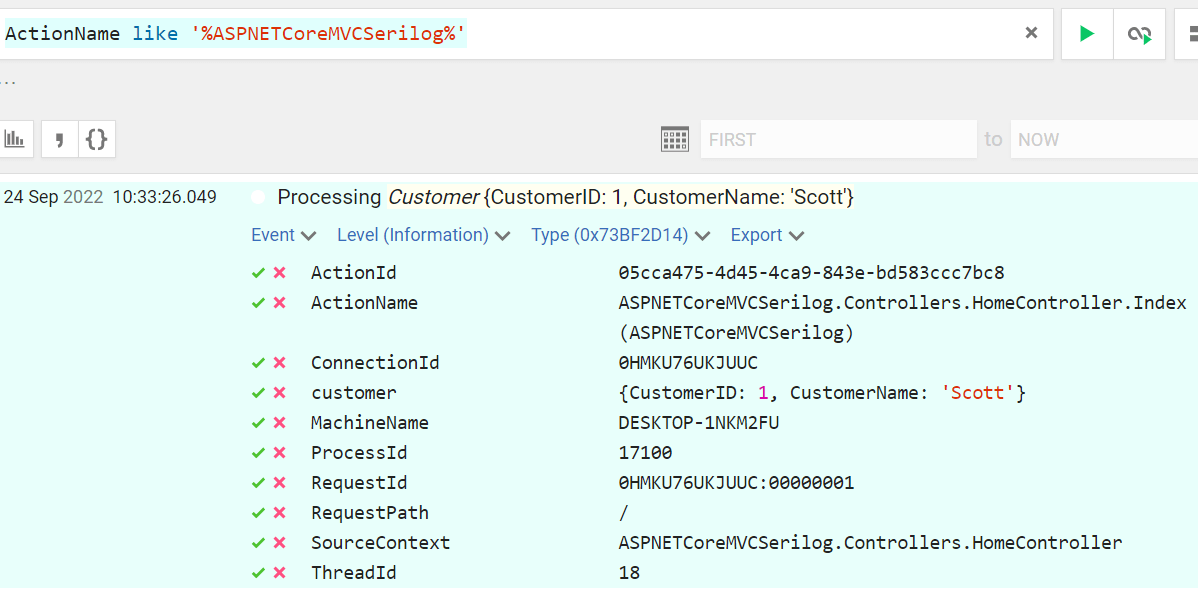
Browse http://localhost:5341/ and in the search box enter this query to filter log events.
ActionName like '%ASPNETCoreMVCSerilog%'You will see the result like this.

Blog Search

-
Building Scalable Applications: Microservice Architecture Challenges
-
The Paradigm Shift to Low-Code and No-Code Development in Software Engineering
-
How To Use AutoMapper in ASP.NET Core Web API
-
Generate Log using Serilog And Seq In ASP.NET Core MVC 6
-
How to Setup CORS Policies in ASP.NET Core Web API