Example for hosting WCF service in Windows service.
This article demonstrates the required steps to host your WCF service in Windows Service and consume it in a console application.
Hosting WCF service to Windows service gives you the following benefits.
- Service will be automatically started whenever the hosting computer starts. Service can be manually started, stop, or restart.
- Service will always be activated and available for clients. No need for runtime activation.
- Windows Administrators already know managing Windows services.
- Provides an extra layer of security through windows identity.
- Gives better performance than service hosted in IIS.
- Gives you the flexibility to choose any bindings.
Host WCF Product Service to windows Service
-
Create a WCF Service library
Create a new WCF Service library with the help of Create a new WCF service library and test using WCFTestClient
-
Add Windows service application for hosting
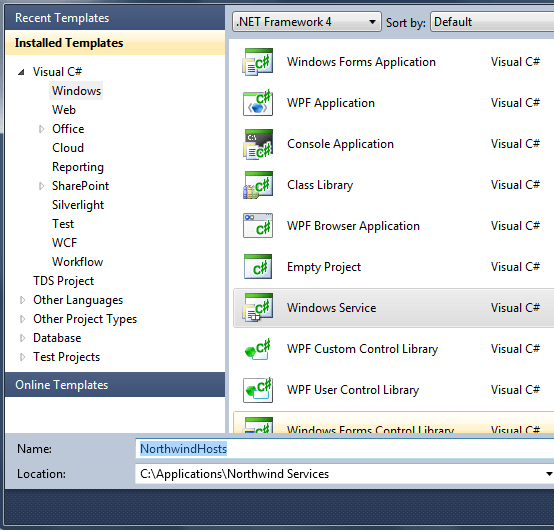
Add new windows service application by right click on the solution and select a new project -> windows from installed template -> Windows Service. Name the project as NorthwindHosts.

-
Add Product Service Host
Add a new class to NorthwindHosts project name it as ProductServiceHost. You can mark it as internal as it will be referred only by the NorthwindHosts assembly. Add a reference to NorthwindServices or your WCF service and System.ServiceModel.
Create an object of ServiceHost and write methods for service start and stop events.
namespace NorthwindHost { internal class ProductServiceHost { static ServiceHost serviceHost = null; public ProductServiceHost() { } internal static void Start() { if (serviceHost != null) { serviceHost.Close(); } //Create a ServiceHost for the ProductService type //and provide base address. serviceHost =new ServiceHost(typeof(ProductService)); //Open the ServiceHostBase to create listeners //and start listening for messages. serviceHost.Open(); } internal static void Stop() { if (serviceHost != null) { serviceHost.Close(); serviceHost = null; } } } } -
Windows Service Class
Add a new windows service class to NorthwindHost by right clicking on the project -> Add -> New Item -> Select Windows Service from template -> name it as ServiceHosts
Right click on newly created ServiceHosts.cs and select view code. ServiceHosts.cs is inherited by ServiceBase. Override the OnStart and OnStop methods to start and stop ProductServiceHost.
namespace NorthwindHost { public partial class ServiceHosts : ServiceBase { public ServiceHosts() { InitializeComponent(); ServiceName = "Northwind Services"; } protected override void OnStart(string[] args) { ProductServiceHost.Start(); } protected override void OnStop() { ProductServiceHost.Stop(); } } } -
Run ServiceHosts
Open Program.cs from NorthwindHost windows service application and run the ServiceHosts.
namespace NorthwindHost { static class Program { static void Main() { ServiceBase[] ServicesToRun; ServicesToRun = new ServiceBase[] { new ServiceHosts() }; ServiceBase.Run(ServicesToRun); } } } -
Add Installer
Add Installer class to NorthwindHost windows service application by right click on NorthwindHost -> select Add -> New Item -> select Installer.cs from Visual C# templates.
Name the newly created Installer.cs as NorthwindInstaller.cs
Right click NorthwindInstaller from solution explorer and select view code.
Add a reference to System.ServiceProcess and add below code to the NorthwindInstaller constructor.
namespace NorthwindHost { [RunInstaller(true)] public partial class ProjectInstaller : System.Configuration.Install.Installer { private ServiceProcessInstaller process; private ServiceInstaller service; public ProjectInstaller() { process = new ServiceProcessInstaller(); process.Account = ServiceAccount.LocalSystem; service = new ServiceInstaller(); service.StartType = ServiceStartMode.Automatic; service.ServiceName = "Northwind Servces"; service.Description = "Northwind Servces"; Installers.Add(process); Installers.Add(service); } } } -
Config settings
Copy <system.serviceModel> settings from your NorthwindServices WCF service and paste it in NorthwindHost windows service's app.config file under <configuration> tag.
With this, your service is ready to install.
-
Northwind WCF service to Windows services
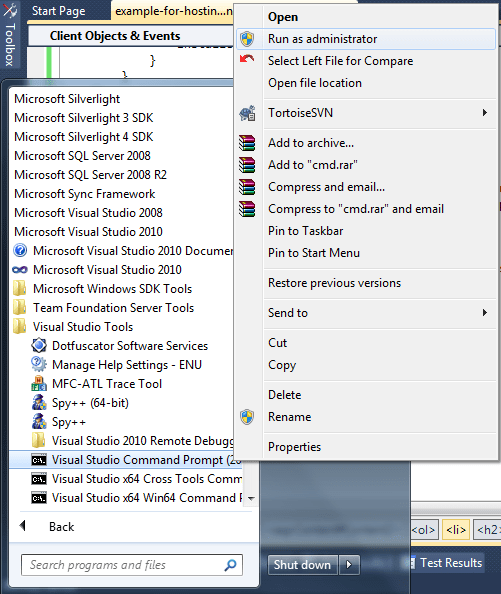
Click on Windows Start button -> Right click on Visual Studio Command Prompt 2010 -> Run as Administrator

Use a CD command till your debug/release folder of NorthwindHosts Windows Service application and execute InstallUtil NorthwindHost.exe

-
Start Northwind windows Service
Go to Services by clicking Windows Start button -> Run -> Enter Services.msc . In the Windows services application locate Northwind Services and start the service by right clicking it.
If any error comes while starting service check the errors in the windows event log.
Now your service is ready to consume.
Blog Search
-
Building Scalable Applications: Microservice Architecture Challenges
-
The Paradigm Shift to Low-Code and No-Code Development in Software Engineering
-
How To Use AutoMapper in ASP.NET Core Web API
-
Generate Log using Serilog And Seq In ASP.NET Core MVC 6
-
How to Setup CORS Policies in ASP.NET Core Web API

