How To Do Custom Validation Using ValidationAttribute of ASP.NET MVC
This article shows how you can use ValidationAttribute class for custom validation based on your requirement.
Validation Attribute class
ValidationAttribute class is included in the DataAnnotations namespace. It helps you to validate the model data received from the user. It gives you many inbuilt validation attributes like StringLength, Required, DataType for validating the model. For a detail description of each validation attribute type MVC Model Validation using DataAnnotation.
Howeve,r sometimes you require custom validation for custom business rules. This article shows you how to validate date on given criteria and compare two dates.
Create ASP.NET MVC application with Model
Follow steps suggested in the ASP.NET MVC model example. It creates a simple MVC application with model binding and its features or you can download the code here.
Create Custom Validation for JoinDate
In this step, you will create the custom validation for the JoinDate property of customer model. The requirement here is, the Join date of customer should be less than the current date. You cannot implement this requirement by using inbuilt DataAnnotations validation attributes.
You will have to create custom validation to achieve this functionality.
Open the application created in the previous step and new class to Models folder.
Give name ValidJoinDate to new class.
Add a reference of System.ComponentModel.DataAnnotations to ValidJoinDate class.
using System.ComponentModel.DataAnnotations;
Add below custom validation logic for ValidJoinDate
namespace FirstMVC.Models
{
    public class ValidJoinDate : ValidationAttribute
    {
        protected override ValidationResult
                IsValid(object value, ValidationContext validationContext)
        {
            DateTime _dateJoin = Convert.ToDateTime(value);
            if (_dateJoin < DateTime.Now)
            {
                return ValidationResult.Success;
            }
            else
            {
                return new ValidationResult
                    ("Join date can not be greater than current date.");
            }
        }
    }
}
ValidationAttribute class
In the previous step, you have used ValidationAttribute class to implement the custom validation. It is an abstract class with IsValid virtual method. The IsValid method takes Value and ValidationContext object as input parameters.
The value represents the value of the model property for which this custom validation applies. ValidationContext describes the context in which validation check is performed.
Create Custom validation for compare model properties
In the previous step, you added validation for the single model property. Sometimes you also require to validate multiple attributes and provide a validation results.
In this step, you will create a custom validation to compare two dates. You will have LastDeliveryDate as property and it must be greater than the value of JoinDate
Add a new class with the name ValidLastDeliveryDate under the Models folder of your application. This class will also inherit from the abstract class ValidationAttribute and implement the IsValid method.
Add below code in LastDeliveryDate.cs file.
using System.ComponentModel.DataAnnotations;

namespace FirstMVC.Models
{
    public class ValidLastDeliveryDate : ValidationAttribute
    {
        protected override ValidationResult
                IsValid(object value, ValidationContext validationContext)
        {
            var model = (Models.Customer)validationContext.ObjectInstance;
            DateTime _lastDeliveryDate = Convert.ToDateTime(value);
            DateTime _dateJoin = Convert.ToDateTime(model.JoinDate);

            if (_dateJoin > _lastDeliveryDate)
            {
                return new ValidationResult
                    ("Last Delivery Date can not be less than Join date.");
            }
            else if (_lastDeliveryDate > DateTime.Now)
            {
                return new ValidationResult
                    ("Last Delivery Date can not be greater than current date.");
            }
            else
            {
                return ValidationResult.Success;
            }
        }
    }
}
validationContext.ObjectInstance returns the current model with values, using which you can refer to all model properties and perform require validation.
Model properties with Custom Validation
Open the Customer.cs file and add below model properties. It adds validation from DataAnnotations class and also adds custom validation which you created in previous steps.
using System.ComponentModel.DataAnnotations;

namespace FirstMVC.Models
{
    public class Customer
    {
        [Required(ErrorMessage="Customer ID is required")]
        public string CustomerID { get; set; }

        [StringLength(10, ErrorMessage =
            "Company Name should be less than or equal to ten characters.")]
        public string CompanyName { get; set; }

        [Range(20,40, ErrorMessage=
            "Customer Age should be in 20 to 40 range." )]
        public int Age { get; set; }

        [DataType(DataType.Date)]
        [DisplayFormat(DataFormatString = "{0:yyyy-MM-dd}"
            , ApplyFormatInEditMode = true)]
        [ValidJoinDate(ErrorMessage=
            "Join Date can not be greater than current date")]
        public DateTime JoinDate { get; set; }

        [DataType(DataType.Date)]
        [DisplayFormat(DataFormatString =
            "{0:yyyy-MM-dd}", ApplyFormatInEditMode = true)]
        [ValidLastDeliveryDate(ErrorMessage =
            "Last Delivery Date can not be less than Join Date")]
        public DateTime LastDeliveryDate { get; set; }

        [DataType(DataType.EmailAddress,ErrorMessage="Email is not valid." )]
        [RegularExpression(@"^\w+([-+.']\w+)*@\w+([-.]\w+)*\.\w+([-.]\w+)*$",
                    ErrorMessage="Email is not valid.")]
        public string Email { get; set; }

        [EnumDataType
            (typeof(EnumCustomerType))]
        public EnumCustomerType CustomerType { get; set; }
    }

    public enum EnumCustomerType
    {
        New = 0,
        Regular = 1,
        Elite = 2
    }
}
Notice properties JoinDate and LastDeliveryDate. It has added functionality for custom validation.
View with a Custom validation errors
In this step, you will change view implementation to display custom error messages.
Open CustomerDetails.cshtml file from Views -> Home folder. And replace the below code.
<html>
<head>
<title>Customer Details - geeksarray.com</title>
<meta name="viewport" content="width=device-width, initial-scale=1" />
<link rel="stylesheet"
href="http://maxcdn.bootstrapcdn.com/bootstrap/3.2.0/css/bootstrap.min.css"/>
<link rel="stylesheet"
href="//code.jquery.com/ui/1.11.2/themes/smoothness/jquery-ui.css" />
<style type="text/css">
.field-validation-error
{
color: #ff0000;
}

.field-validation-valid
{
display: none;
}

.input-validation-error
{
border: 1px solid #ff0000;
background-color: #ffeeee;
}

.validation-summary-errors
{
font-weight: bold;
color: #ff0000;
}

.validation-summary-valid
{
display: none;
}
</style>
</head>
<body>
@model FirstMVC.Models.Customer
<div class="container">
<h2>
<a href="https://geeksarray.com">
<img src="https://geeksarray.com/images/geeksarray.jpeg"
alt="dotnetmentors.com" /></a>
Customer Details
</h2>
    @using (Html.BeginForm("CustomerDetails", "home"))
    {
        <div>
            @Html.ValidationSummary("Please correct below errors")
        </div>
        <div class="form-group">
        <table>
        <tr>
        <td>
            @Html.Label("Customer ID:")
        </td>
        <td>
            @Html.TextBoxFor(m => m.CustomerID)
        </td>
        <td>
            @Html.ValidationMessageFor(m => m.CustomerID, "*")
        </td>
        </tr>
        <tr>
        <td>
            @Html.Label("Company Name:")
        </td>
        <td>
            @Html.TextBoxFor(m => m.CompanyName)
        </td>
        <td>
            @Html.ValidationMessageFor(m => m.CompanyName, "*")
        </td>
        </tr>
        <tr>
        <td>
             @Html.Label("Age:")
        </td>
        <td>
            @Html.TextBoxFor(m => m.Age)
        </td>
        <td>
            @Html.ValidationMessageFor(m => m.Age, "*")
        </td>
        </tr>
        <tr>
        <td>
            @Html.Label("Join Date:")
        </td>
        <td>
            @Html.TextBoxFor(m =>m.JoinDate,new{id="txtJoinDate"})
        </td>
        <td>
            @Html.ValidationMessageFor(m => m.JoinDate, "*")
        </td>
        </tr>
        <tr>
        <td>
            @Html.Label("Last Delivery Date:")
        </td>
        <td>
            @Html.TextBoxFor(m => m.LastDeliveryDate,
        new { id = "txtLastDeliveryDate" })
        </td>
        <td>
            @Html.ValidationMessageFor(m => m.LastDeliveryDate, "*")
        </td>
        </tr>
        <tr>
        <td>
            @Html.Label("Email:")
        </td>
        <td>
            @Html.TextBoxFor(m => m.Email)
        </td>
        <td>
            @Html.ValidationMessageFor(m => m.Email, "*")
        </td>
        </tr>
        <tr>
        <td>
            @Html.Label("Customer Type:")
        </td>
        <td>
            @Html.TextBoxFor(m => m.CustomerType)
        </td>
        <td>
            @Html.ValidationMessageFor(m => m.CustomerType, "*")
        </td>
        </tr>
        <tr>
        <td>

        </td>
        <td>
            <button type = "submit" class="btn btn-default">
                Submit</button>
        </td>
        </tr>
        </table>
        </div>

}
    </div>
<script src="https://code.jquery.com/jquery-3.5.1.min.js" type="text/javascript"></script>

<script src="https://cdnjs.cloudflare.com/ajax/libs/jquery-validate/1.19.2/jquery.validate.min.js"
    type="text/javascript"></script>

<script src="https://cdnjs.cloudflare.com/ajax/libs/jquery-validation-unobtrusive/3.2.11/jquery.validate.unobtrusive.min.js"
    type="text/javascript"></script>
<script src="http://maxcdn.bootstrapcdn.com/bootstrap/3.2.0/js/bootstrap.min.js"
    type="text/javascript"></script>

<script src="//code.jquery.com/ui/1.11.2/jquery-ui.js"
type="text/javascript"></script>
<script type="text/javascript">

$(function () {
$("#txtJoinDate").datepicker({
changeMonth: true,
changeYear: true
});

$("#txtLastDeliveryDate").datepicker({
changeMonth: true,
changeYear: true
});

});
</script>
</body>
</html>
Validation summary with custom validation message
Now run the application and browse to http://localhost:52937/home/CustomerDetails. Note that you may have to change the port number of URL.
Select some future date for JoinDate and select any date less than JoinDate for LastDeliveryDate. Click the Submit button. You will see below output.
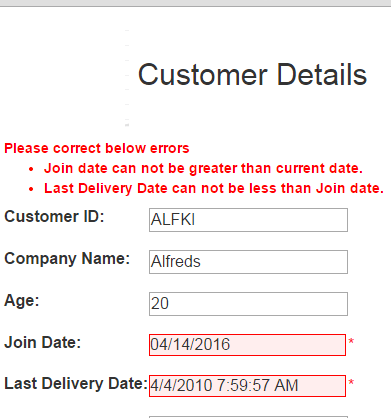
When you hit the Submit button, DataAnnotations validation executes on client side and server side however custom validation executes only on server side by calling controller ActionMethod. For client side custom validation you will have to implement IClientValidatable interface.

Blog Search

-
Building Scalable Applications: Microservice Architecture Challenges
-
The Paradigm Shift to Low-Code and No-Code Development in Software Engineering
-
How To Use AutoMapper in ASP.NET Core Web API
-
Generate Log using Serilog And Seq In ASP.NET Core MVC 6
-
How to Setup CORS Policies in ASP.NET Core Web API