How To Enable HTTP Compression in ASP.NET Website
This article shows how you can use HTTP compression in ASP.NET
HTTP compression reduces request/response weight and speeds up page load time. It is Webservers builtin capability to make better use of bandwidth. It helps you to improve your site performance with not much effort. For more tips on ASP.NET Website Performance Improvement Tips.
You can enable or configure HTTP Compression using the below methods.
- Enable in IIS
- Command Prompt
- Configure in Web.config file
- Compress physical files using GZipStream
Enable in IIS
IIS provides below options for compression
-
Static files only
You can configure HTTP compression of your static files like pure HTML (.htm), text files (*.txt), office documents(*.docx, *.ppt, *.xlsx), CSS (*.css), javascript (*.js). The size of those files can be reduced using compression features. It helps to reduce download time and reduce the required bandwidth of the server.
You do not get many benefits by using HTTP compression with image files.
-
Dynamic Response only
You can configure HTTP compression for the content which generates dynamically. It helps more efficient utilization of server bandwidth depending on server's processor utilization.
If server's processor utilization is already high then dynamic compression will have extra load and it can make the site slower. So HTTP compression for dynamic content requires more analysis and configuration.
Configure HTTP compression
- Open the IIS server by using inetmgr from the windows Run command box.
- Click on sites. It shows you all the sites hosted on this server. If you want to enable HTTP compression for all sites you can configure the settings by clicking on server name.
- Select the site for which you want to configure HTTP compression under the Sites node.
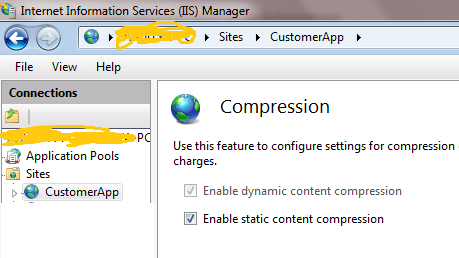
- From the right pane of IIS manager click on Compression.
- Select Enable dynamic content compression for dynamic content.
-
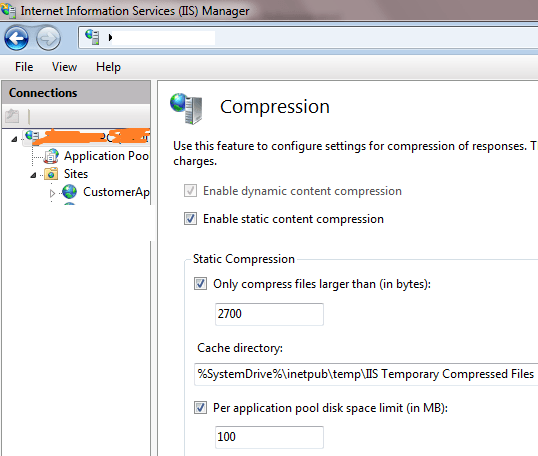
Select Enable static Content compression for static content.
You can also configure the details like which static files should compress and location for caching static files for all websites.
- Open IIS manager (inetmgr).
- Click on <server name>.
- From the right pane of IIS manager click on Compression.
-
It displays compression settings. Click on Enable static content compression
Enable HTTP compression using command prompt
You can enable the HTTP compression using the command prompt.
- Open visual studio command prompt using Run as Administrator.
-
Go to inetsrv directory of system32. Use below command to go for the right directory.
cd %windir%\system32\inetsrv - Use Appcmd for more configuration. As this command can be executed by only Administrators group members it is required you to open the command prompt as Administrator.
-
For compression of static content use below command
appcmd set config /section:urlCompression /minFileSizeforComp: int /directory: string /maxDiskSpace: int -
To enable dynamic content compression use below command at command prompt.
appcmd set config /section:urlCompression /doDynamicCompression:True
It makes changes to your machine.config file and configuration will be applied to all websites hosted on this machine.
Configure HTTP compression in Web.config
You can enable httpCompression for your application using Web.config file. You need to configure <httpCompression /> and <urlCompression /> elements under <system.webServer />
Add below configuration in the web.config file.
<system.webServer>

<httpCompression directory="%SystemDrive%\inetpub\temp\IIS Temporary Compressed Files">
    <scheme name="gzip" dll="%Windir%\system32\inetsrv\gzip.dll" staticCompressionLevel="9" />
    <dynamicTypes>
    <add mimeType="text/*" enabled="true" />
    <add mimeType="message/*" enabled="true" />
    <add mimeType="application/x-javascript" enabled="true" />
    <add mimeType="application/json" enabled="true" />
    <add mimeType="*/*" enabled="false" />
    </dynamicTypes>
    <staticTypes>
    <add mimeType="text/*" enabled="true" />
    <add mimeType="message/*" enabled="true" />
    <add mimeType="application/x-javascript" enabled="true" />
    <add mimeType="application/atom+xml" enabled="true" />
    <add mimeType="application/xaml+xml" enabled="true" />
    <add mimeType="*/*" enabled="false" />
    </staticTypes>
</httpCompression>

<urlCompression doStaticCompression="true" doDynamicCompression="true" />

</system.webServer >
httpCompression mention which location should be used for compression. It uses the gzip dll for gzip encoding and the types of contents which should get compressed.
UrlCompression Element specifies which type of content should get compressed. As mentioned in previous points you can enable for static and/or dynamic contents of applications.
Compress physical files using GZipStream
You can compress physical aspx,css,js files, and deploy it to the server. It saves server's bandwidth as the file size are smaller.
Use below code
private void CompressFile(string srcPath,
                 string tarPath)
{
    using(FileStream srcStream
                = File.OpenRead(srcPath))
    {
        using(FileStream tarStream
                    = File.OpenWrite(tarPath));
        {
            using(GZipStream cStream = new GZipStream(srcStream,
                CompressMode.Compress))
            {
            byte[]data = new byte[srcStream.Length];
            srcStream.Read(data, 0, data.Length);
            tarStream.Write(data, 0, data.Length);
            }
        }
    }
}
Apart from httpCompression you can use other IIS settings to improve ASP.NET Website Performance
Blog Search

-
Building Scalable Applications: Microservice Architecture Challenges
-
The Paradigm Shift to Low-Code and No-Code Development in Software Engineering
-
How To Use AutoMapper in ASP.NET Core Web API
-
Generate Log using Serilog And Seq In ASP.NET Core MVC 6
-
How to Setup CORS Policies in ASP.NET Core Web API