"Why is my input undefined in the constructor?" and "why does my app leak memory?" have the same answer: the component lifecycle. Angular creates, checks, and destroys components on a strict schedule, and each phase has a hook. This article walks the hooks in their real firing order — proven by a demo component that logs every one — and pins down the two hooks that matter daily, on Angular 20 with verified output.
The order, observed
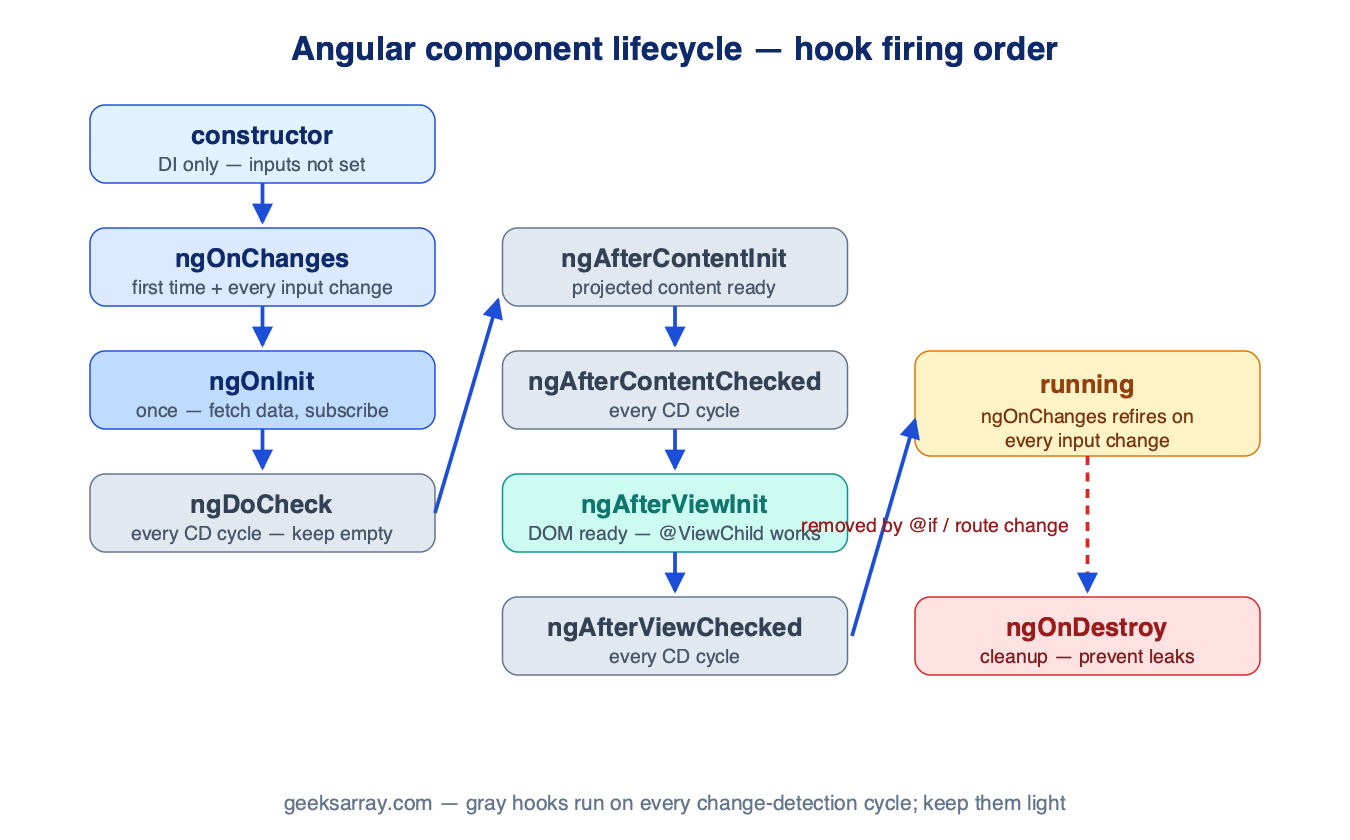
The demo component implements every major hook and records each call. Actual sequence from the running app:
constructor — DI done, inputs NOT set yet
ngOnChanges — productId unset -> 1
ngOnInit — inputs ready; fetch data, start subscriptions here
ngAfterViewInit — the DOM below me exists now
ngOnChanges — productId 1 -> 2        (parent changed the input)
ngOnDestroy — cleanup ran             (parent removed the component)
That log answers the classic confusions directly: inputs are not available in the constructor (they arrive before ngOnChanges/ngOnInit); the DOM isn't queryable until ngAfterViewInit; and destruction is your only cleanup chance.
The hooks that earn their keep
ngOnInit — initialization. Runs once, after the first ngOnChanges, with all inputs set. This is where data loading and subscription setup belong:
ngOnInit(): void {
  this.timer = setInterval(() => this.refresh(), 60_000);
}
Why not the constructor? Two reasons: inputs aren't set there, and constructors should be cheap wiring (DI) — testability suffers when construction has side effects.
ngOnDestroy — cleanup. The leak preventer:
ngOnDestroy(): void {
  clearInterval(this.timer);
}
Intervals, manual RxJS subscriptions, WebSocket connections, and DOM listeners added outside Angular all outlive the component unless you end them here. A routed-away component that kept its interval still runs it — forever, once per navigation. Modern alternatives shrink this hook: takeUntilDestroyed() auto-completes streams, and DestroyRef.onDestroy(...) registers cleanup without implementing the interface — but the concept is identical.
ngOnChanges — reacting to input updates. Fires before ngOnInit and again on every input change, with a SimpleChanges map:
ngOnChanges(changes: SimpleChanges): void {
  const c = changes['productId'];
  console.log(`productId ${c.previousValue ?? 'unset'} -> ${c.currentValue}`);
}
The classic use — refetch when an id input changes — has a cleaner modern form: make the input a signal (productId = input.required<number>()) and derive with computed/effect; the reaction is declared once instead of dug out of a changes map. ngOnChanges remains what you'll read in existing codebases.
ngAfterViewInit — the DOM exists. @ViewChild references resolve here; third-party widgets (charts, maps) initialize here. Setting state that the template renders here triggers the famous ExpressionChangedAfterItHasBeenCheckedError in dev mode — that error is the framework telling you the value changed after the check pass; move the change earlier (or queueMicrotask it).
The hooks you'll rarely touch
ngDoCheck, ngAfterContentInit/Checked, and ngAfterViewChecked exist for custom change detection and content-projection timing. The *Checked hooks run on every change-detection cycle — putting real work in them is a performance foot-gun. If you're reaching for ngDoCheck, a computed signal almost certainly expresses the intent better.
Destruction is recursive — and conditional rendering triggers it
@if removing a component, @for dropping an item, and router navigation all destroy the affected component and its whole subtree, firing ngOnDestroy bottom-up. The demo's toggle button proves it:
<button (click)="showLifecycle.set(!showLifecycle())">Toggle component</button>
@if (showLifecycle()) {
  <app-lifecycle-demo [productId]="productId()" />
}
Toggle off: destroy runs, interval cleared. Toggle on: a fresh instance — constructor, ngOnChanges, ngOnInit again, state reset. Components hidden with CSS ([hidden]) keep their instance; components removed with @if don't. Choosing between those two is choosing whether state survives — make it consciously.
Working rules
- Constructor = DI only.
ngOnInit= setup.ngOnDestroy= teardown, always paired with whateverngOnInitstarted. - Reacting to inputs: prefer signal inputs +
computed; usengOnChangesin legacy code. - Touch the DOM in
ngAfterViewInit, not earlier. - Anything with
Checkedin the name runs constantly — keep it near-empty.
The demo component with every hook logging — plus the toggle and input-change buttons to trigger them — is in the companion repository, part of the same workspace as the components tutorial: npm install && ng serve, open the console, and watch the order happen.
Comments (0)
No comments yet — be the first to share your thoughts.