Create Azure VM using C# Fluent SDK
This blog explains how to create an Azure Virtual Machine with a resource group, storage account, virtual network, network interface, etc. using C# Fluent SDK.
A virtual machine can be created using Azure portal, Azure CLI, ARM templates, Powershell, or SDK. Different SDKs are available for various programming languages.
Fluent SDK
Azure Fluent SDK allows you to manage Azure resources like create, update or delete. Fluent API reduces the complexity of multiple classes and their objects by chaining methods, where the method is directly called on another and forming a chain-like structure. Fluent API pattern is open source and hosted at Azure Libraries For .Net.
The following code is an example of method chaining using EF core Fluent API
modelBuilder.Entity<Employee>()
    .HasOne<EmployeeAddress>(e => e.Address)
    .WithOne(em => em.Employee)
    .HasForeignKey<EmployeeAddress>(em => em.EmpId);
Create a .NET Core Console application using Visual Studio or Visual studio code and follow the below steps to Create Virtual Machine
-
Install NuGet Package
To use Fluent SDK we need libraries from NuGet Package - Microsoft.Azure.Management.Fluent. This package provides you, necessary classes, to manage Azure resources.
Open NuGet Manager Console from the Tools menu of Visual Studio and execute the following command.
Install-Package Microsoft.Azure.Management.Fluent -
Azure Credential File
A Credential file allows us to connect Microsoft Azure using a Principal Service account. This does not need Azure AD authentication.
Add a JSON file with the name azure-configuration.json to the console application and add the following settings with correct values. To get Azure Credential How to Get Azure Subscription, Tenant, Client ID, Client secret
{ "clientId": <client id of application>, "clientSecret": <client secret from certificate used with application>, "subscriptionId": <your azure subscription id>, "tenantId": <azure tenant id from Azure Active directory>, "activeDirectoryEndpointUrl": "https://login.microsoftonline.com", "resourceManagerEndpointUrl": "https://management.azure.com/", "activeDirectoryGraphResourceId": "https://graph.windows.net/", "sqlManagementEndpointUrl": "https://management.core.windows.net:8443/", "galleryEndpointUrl": "https://gallery.azure.com/", "managementEndpointUrl": "https://management.core.windows.net/" } -
Declare Azure resource name
Add a new class with the name AzureVM.cs, and add a method with the name CreateAzureWindowsVM to it. This file will be used to manage Azure resources.
Add following code to the AzureVM.cs file to refer required assembly and declare resource name using variables.
using System; using Microsoft.Azure.Management.Compute.Fluent.Models; using Microsoft.Azure.Management.Fluent; using Microsoft.Azure.Management.ResourceManager.Fluent; using Microsoft.Azure.Management.ResourceManager.Fluent.Core; using Microsoft.Azure.Management.Network.Fluent.Models; namespace AzureFluentSDK { public class AzureVM { public void CreateAzureWindowsVM() { // declare variables var groupName = "RG-FluentResourceGroup"; var vmName = "VM-FluentVMTesting"; var location = Region.USCentral; var vNetName = "VNET-Fluent"; var vNetAddress = "172.16.0.0/16"; var subnetName = "Subnet-Fluent"; var subnetAddress = "172.16.0.0/24"; var nicName = "NIC-Fluent"; var adminUser = "azureadminuser"; var adminPassword = "Pas$m0rd$123"; var publicIPName = "publicIP-Fluent"; var nsgName = "NSG-Fluent"; } } } -
Azure Authenticate from credentials file
To manage Azure resources using Fluent API you will have to authenticate by providing required credentials.
The credentials stored in azure-configuration.json will be used for authentication. Add the following code CreateAzureWindowsVM method.
var credentials = SdkContext.AzureCredentialsFactory .FromFile("../../../azure-configuration.json"); var azure = Azure.Authenticate(credentials).WithDefaultSubscription(); -
Create Virtual Network
Using VNet Virtual machine can securely communicate with other Azure resources, internet, on premises resource, filter inbound or outbound traffic.
Create a VNet using following code and attach to VM while creating.
Console.WriteLine($"Creating virtual network {vNetName} ..."); var network = azure.Networks.Define(vNetName) .WithRegion(location) .WithExistingResourceGroup(groupName) .WithAddressSpace(vNetAddress) .WithSubnet(subnetName, subnetAddress) .Create(); -
Create Public IP
If Virtual Machine needs to be connected through internet then it must be associated with Public IP. You can remote to Virtual Machine using this IP address.
Console.WriteLine($"Creating public IP {publicIPName} ..."); var publicIP = azure.PublicIPAddresses.Define(publicIPName) .WithRegion(location) .WithExistingResourceGroup(groupName) .Create(); -
Create Network Security Group
Network Security group manages security rules that filter inbound or outbound traffic. You can explicitly specify resource source, destination, port, and protocol to be used.
Console.WriteLine($"Creating Network Security Group {nsgName} ...");
var nsg = azure.NetworkSecurityGroups.Define(nsgName)
    .WithRegion(location)
    .WithExistingResourceGroup(groupName)
    .Create();
Add below code to Update NSG to allow RDP using TCP protocol.
Console.WriteLine($"Creating a Security Rule for allowing the remote"); nsg.Update() .DefineRule("Allow-RDP") .AllowInbound() .FromAnyAddress() .FromAnyPort() .ToAnyAddress() .ToPort(3389) .WithProtocol(SecurityRuleProtocol.Tcp) .WithPriority(100) .Attach() .Apply(); -
Create Network Interface
Virtual Machine needs at least one Network Interface. NIC connects to the VNet to secure communication.
You can attach one or more NIC to VM if you are creating using Azure CLI or Fluent API however you can attach only one NIC if you are creating VM using Azure Portal.
Console.WriteLine($"Creating network interface {nicName} ..."); var nic = azure.NetworkInterfaces.Define(nicName) .WithRegion(location) .WithExistingResourceGroup(groupName) .WithExistingPrimaryNetwork(network) .WithSubnet(subnetName) .WithPrimaryPrivateIPAddressDynamic() .WithExistingPrimaryPublicIPAddress(publicIP) .WithExistingNetworkSecurityGroup(nsg) .Create(); -
Create Virtual Machine
Now all required resources are created in the Azure environment. You can use these resources while creating Virtual Machine.
For this tutorial, we are creating a Virtual Machine of type 2012-R2-Datacenter. You can create Linux Virtual Machine or other types using the same method.
Console.WriteLine($"Creating virtual machine {vmName} ...");
azure.VirtualMachines.Define(vmName)
    .WithRegion(location)
    .WithExistingResourceGroup(groupName)
    .WithExistingPrimaryNetworkInterface(nic)
    .WithLatestWindowsImage("MicrosoftWindowsServer", "WindowsServer",
        "2012-R2-Datacenter")
    .WithAdminUsername(adminUser)
    .WithAdminPassword(adminPassword)
    .WithComputerName(vmName)
    .WithSize(VirtualMachineSizeTypes.StandardDS2V2)
    .Create();
The entire code file is available GitHub.
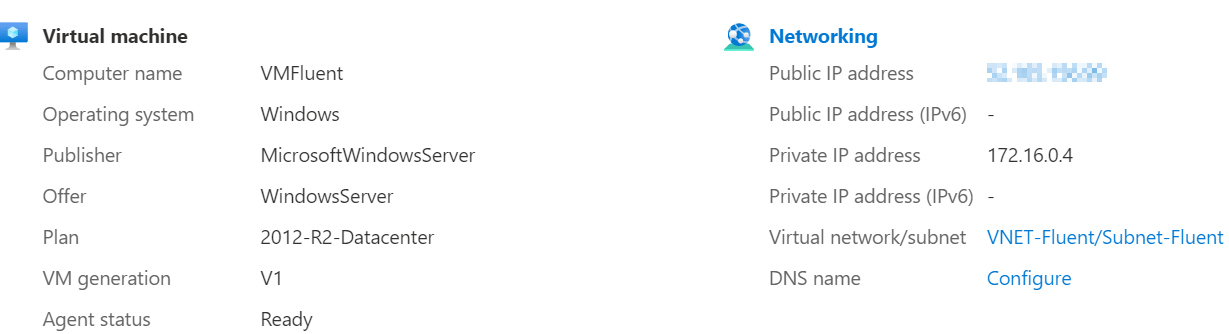
Your Virtual Machine is created successfully.
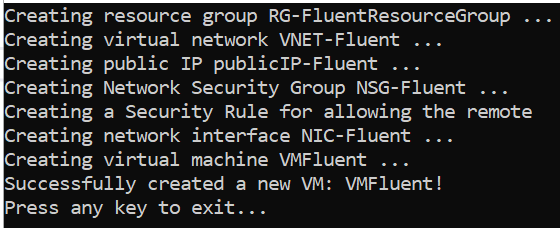
You can also verify by using Azure Portal. You should see a Virtual Machine with the name VMFluent with all its required Azure resources.
-
Check Virtual Machine Status
using Fluent SDK you can verify the status of any Virtual machine by providing Id of virtual machine.
You can have Deallocated, Deallocating, Running, Starting, Stopped, Stopping, Unknown status. If your virtual machine is started then you will see the status as Running by using following code.
private void CheckVMStatus(IAzure azure, string vmID) { PowerState state = azure.VirtualMachines.GetById(vmID).PowerState; Console.WriteLine ("Currently VM {0} is {1}", vmID, state.ToString()); } -
ShutDown Virtual Machine
Fluent SDK API can shut down any Virtual Machine by its ID. You can use the code as:
private void ShutDownVM(IAzure azure, string vmID)
{
    azure.VirtualMachines.GetById(vmID).PowerOff();

    PowerState state =
        azure.VirtualMachines.GetById(vmID).PowerState;

    Console.WriteLine
        ("Currently VM {0} is {1}", vmID, state.ToString());
}
If you get The client xxx with object id xxx does not have authorization to perform action Microsoft.Resources/subscriptions/resourcegroups/write' over scope error execute following command using Azure CLI.
az role assignment create --assignee-object-id < client id >
	--scope subscriptions/< subscription id > --role contributor
If you get Microsoft.IdentityModel.Clients.ActiveDirectory.AdalServiceException: 'AADSTS7000215: Invalid client secret is provided. error, validate your client secret id of application. You need to copy Value of applications' client secret.

Blog Search

-
Building Scalable Applications: Microservice Architecture Challenges
-
The Paradigm Shift to Low-Code and No-Code Development in Software Engineering
-
How To Use AutoMapper in ASP.NET Core Web API
-
Generate Log using Serilog And Seq In ASP.NET Core MVC 6
-
How to Setup CORS Policies in ASP.NET Core Web API