CRUD Operations using ASP.NET Web API Core
This tutorial gives you step by step implementation of creating CRUD operations using ASP.NET Web API Core.
This tutorial builds API for its clients to manage suppliers. It uses the In-Memory database created in Startup.cs file. Also, it shows how to configure the SQL server connection to manage CRUD operations in real-time applications.
CRUD performs below operations on data store.
| Operation | API | Description | |
|---|---|---|---|
| Create | POST /api/supplier | Add New Supplier | |
| Read | GET /api/supplier/ | Get all Supplier details | |
| Read | GET /api/supplier/{id} | Get Supplier details by ID | |
| Update | PUT /api/supplier/{id} | Update an existing item | |
| Delete | DELETE /api/supplier/{id} | Delete an item |
To complete this tutorial you need to have Visual Studio
Follow below steps to create ASP.NET Web API with CRUD operations
-
Create ASP.NET Web API Project
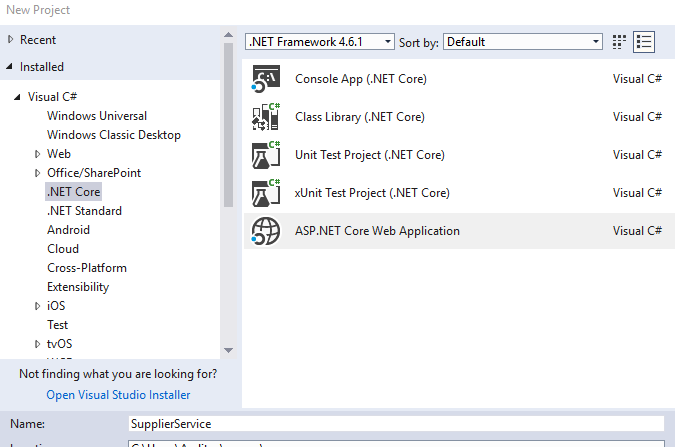
Open your Visual Studio and select New Project from File Menu.
Select .Net Core -> ASP.NET Core Web Application from Project Template. Enter the name of the application as SupplierAPI and click Ok.
You will see ASP.NET Core Web Application - SupplierService dialog. Select .Net Core and ASP.Net Core 2.0
Then select API as shown in below picture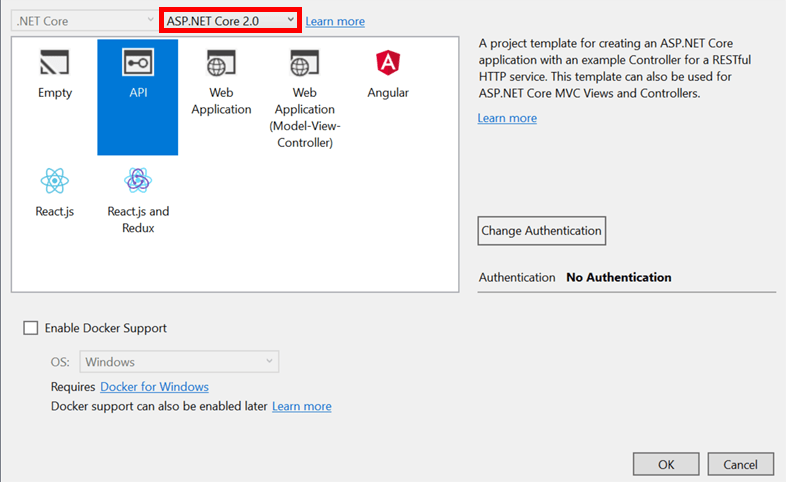
Your SupplierService application is created with basic required settings. If you launch your application and hit http://localhost:<port>/api/values, you will see a JSON object rendered with values like ["value1","value2"].
-
Add Model to SupplierService API
In this step, you will add the Supplier Model which will define database entity.
Right click on the SupplierService project from solution explorer and select Add -> New Folder.
Enter folder name as Models.Right click on the Models folder and select Add -> Class and add class file with name Supplier.cs.
Now you can add Supplier model properties. Open Supplier.cs file from Models folder and below properties to it.
using System; using System.Collections.Generic; using System.Linq; using System.Threading.Tasks; namespace SupplierService.Models { public class Supplier { public int Id { get; set; } public string CompanyName { get; set; } public string ContactName { get; set; } public string ContactTitle { get; set; } public string City { get; set; } public string Country { get; set; } public string Phone { get; set; } public string Fax { get; set; } } } -
Create DatabaseContext
Database Context is the main class that coordinates between domain classes and database. This class is created by deriving Microsoft.EntityFrameworkCore.DbContext.
Add a new file the with name SupplierContext.cs to Models folder and add the below code.
public class SupplierContext : DbContext
{
    public SupplierContext(DbContextOptions<SupplierContext> options)
        : base(options)
    {

    }

    public DbSet<Supplier> Suppliers { get; set; }
}
DbSet exposes properties which represent the collection of specified entity. Once you have DbContext ready you can make a query to the database, change tracking, persisting data, caching of data, manage entity relationships.
-
Add Web API Controller
Web API Controller is responsible for accepting the client's HTTP request, process request through Action methods and return the result.
Right click on Controllers folder, select Add -> Controller. You will see Add Scaffold dialog box, select API Controller - Empty name it as SupplierController and click Ok.
Replace below code for constructor of SupplierController. This constructor uses Dependency Injection to inject database context. Database context is used in each of the CRUD operations. Constructor adds two Supplier details to the in memory database which is defined in Statrup.cs file.
using System; using System.Collections.Generic; using System.Linq; using System.Threading.Tasks; using Microsoft.AspNetCore.Http; using Microsoft.AspNetCore.Mvc; using WebAPITest.Models; namespace SupplierAPI.Controllers { [Produces("application/json")] [Route("api/[controller]")] public class SupplierController : Controller { private readonly SupplierContext _context; public SupplierController(SupplierContext context) { _context = context; if (_context.Suppliers.Count() == 0) { _context.Suppliers.Add(new Supplier { CompanyName = "Mumbai Traders", ContactName = "Peter Wilson", City = "Mumbai", Country = "India", Phone = "(617)555-3267", ContactTitle = "Manager" }); _context.Suppliers.Add(new Supplier { CompanyName = "Exotic Liquids", ContactName = "Peter Wilson", City = "Boston", Country = "USA", Phone = "(617)555-3267", ContactTitle = "Manager" }); _context.SaveChanges(); } } } } -
GET method of Web API
In this step, you will implement a GET Web API to read supplier details. Get methods can be used to get all suppliers depending on filters or get specific suppliers.
For this, you will implement two different action methods that are GetAll to get all suppliers as list and GetById to get particular Supplier details.
-
GetAll
[HttpGet]
public IEnumerable GetAll()
{
    return _context.Suppliers.ToList();
}
GetAll method returns IEnumerable object, MVC framework will serialize this object to JSON object and add it to the response body.
Routing - We have used route for controller as [Route("api/[controller]")], it replaces Controller name with controller class name minus "Controller" Suffix. In our case it is SupplierController. So if the request comes with URL - http://domainname.com/api/supplier - it will be handled by the Supplier Web API controller.
-
GetById
[HttpGet("{id}", Name = "GetSupplier")]
public IActionResult GetById(long id)
{
    var item = _context.Suppliers.FirstOrDefault(t => t.Id == id);
    if (item == null)
    {
        return NotFound();
    }
    return new ObjectResult(item);
}
GetByID method returns IActionResult. Using IActionResult you can return format specific results. If the item is not found for provided Supplier ID - it returns 404 error.
Routing - For GetById we have used [HttpGet("{id}", Name = "GetSupplier")]. Any request with http://domainname/api/supplier/{supplierid} will be handled by this API method.
-
GetAll
-
Implement Create operation using HTTPPost
In this step, you will implement a Web API method that will accept HttpPost requests and create a new resource in the data store.
Add below code in SupplierController.cs[HttpPost] public IActionResult Create([FromBody] Supplier item) { if (item == null) { return BadRequest(); } _context.Suppliers.Add(item); _context.SaveChanges(); return CreatedAtRoute("GetById", new { id = item.Id }, item); }This code accepts HTTPPost requests. [FromBody] attribute says use details of the new supplier from the HTTP request body. It creates a new Supplier using DbContext to datastore.
This code returns CreatedAtRoute which returns URI to the newly created resource when you invoke the POST method.
-
Implement Update method using HTTPPut
HTTPPut method updates existing data from the data server. PUT method requires the client to send entire details of resources to update..
Add below code to SupplierController.cs file.
    [HttpPut("{id}")]
    public IActionResult Update(long id, [FromBody] Supplier item)
    {
        if (item == null || item.Id != id)
        {
            return BadRequest();
        }

        var supplier = _context.Suppliers.FirstOrDefault(t => t.Id == id);
        if (supplier == null)
        {
            return NotFound();
        }

        supplier.CompanyName = item.CompanyName;
        supplier.ContactName = item.ContactName;
        supplier.ContactTitle = item.ContactTitle;
        supplier.Country = item.Country;
        supplier.City = item.Country;

        _context.Suppliers.Update(supplier);
        _context.SaveChanges();
        return new NoContentResult();
    }
It updates values sent in HttpRequest body. If a resource with specific id is not found it returns NotFound response.
If a resource exists in datastore it updates resources using DbContext and returns 204 (NoContent) result set. -
Implement Delete using HTTPDelete
HTTPDelete will delete existing resource from data store. Delete method needs id to fetch records and delete it. HTTP Delete request URL http://localhost:<portnumber>/api/supplier?id=1 has query string parameter with value as 1. On successful execution, HTTP status 200 will be returned to client.
Add the below code in SupplierController.cs file.
    [HttpDelete("{id}")]
    public IActionResult Delete(long id)
    {
        var supplier = _context.Suppliers.FirstOrDefault(t => t.Id == id);
        if (supplier == null)
        {
            return NotFound();
        }

        _context.Suppliers.Remove(supplier);
        _context.SaveChanges();
        return new NoContentResult();
    }
Launch your Supplier Service Web API, it will show http://localhost:<portnumber>/api/supplier and renders two suppliers which you added in Startup.cs. You can test CRUD opertaions using Postman.

Blog Search

-
Building Scalable Applications: Microservice Architecture Challenges
-
The Paradigm Shift to Low-Code and No-Code Development in Software Engineering
-
How To Use AutoMapper in ASP.NET Core Web API
-
Generate Log using Serilog And Seq In ASP.NET Core MVC 6
-
How to Setup CORS Policies in ASP.NET Core Web API