Getting Started with ASP.NET Core Web API and Entity Framework
Get started with ASP.NET Core Web API and Entity Framework by building a basic API to get data from SQL Server. And features like CORS Policy, and Logging.
With this tutorial, we will create a basic ASP.NET Web API that reads product data of the AdventureWorks database using Entity Framework. The code from this tutorial is written using Visual Studio 2022 and .Net Core 7.
Create ASP.NET Web API
Open Visual Studio -> Click on File -> New -> Project -> Search for template ASP.NET Core Web API -> you will see Configure your new Project dialog box
Set Project Name as GeekStore.API and Solution name as GeekStore -> Click Next.
In the next dialog box, select the latest Framework available for you, -> Uncheck the checkbox for UseControllers for creating API with minimal dependencies.
As we are using minimal API, only appsettings.json and program.cs files are added.
ASP.NET Core Web API adds some sample data about weatherforecast in the program.cs file, you can delete it.
-
Create AdventureWorks database
For this tutorial, we will read data from Production.Product table of the AdventureWorks database.
If you do not have AdventureWorks database you can get the SQL Server AdventureWorks scripts to create the database.
-
Install NuGet Packages
In this step, you will install the required NuGet packages to create models from the existing SQL Server database. Click on Tools menu from Visual Studio -> NuGet Package Manager -> Package Manager Console. And execute the below commands to install packages.
- Install-package Microsoft.EntityFrameworkCore
- Install-package Microsoft.EntityFrameworkCore.Sqlserver
- Install-package Microsoft.EntityFrameworkCore.Tools
-
Add a Database context
DBContext class interacts with the database, performs CRUD operations, configures models and their relationship, manages transactions, etc. An instance of DbContext represents the connection with the database and can perform any required operation on the database.
As we are having Entity Framework Core Database first approach, we will be using Scaffold-DbContext command to create DbContext and models.
Scaffold-DbContext command generates models for all tables and their relationships from the database. For simplicity of this tutorial we will be generating a model only for Production.Product table.
Execute this command in the Package Manager Console. Replace the server name with your SQL server name.
Scaffold-DbContext
    "Data Source=<server name>Initial Catalog=AdventureWorks2017;Integrated Security=True;"
    -Tables Production.Product
    -Provider Microsoft.EntityFrameworkCore.SqlServer
    -OutputDir Models
After successful execution, you can verify files Product.cs and AdventureWorks2017Context.cs are created under the Model folder.
Product table is ready for performing CRUD operations.
-
Add API Controller
Web API controller is the first point of contact to access API. It is similar to the ASP.NET MVC controller and handles requests and responses. API Controller is derived from ControllerBase abstract class.
Add a new folder with the name Controllers under the root directory of the application.
Add a API Controller by right click on Controllers folder -> select Add -> Controller -> Select API from middle pane -> Select API Controller Empty from middle pane. -> click Add -> name it as ProductsController.cs -> Click Add.
You will see a Controller added with the following code.
using Microsoft.AspNetCore.Mvc; namespace GeeksStore.API.Controllers { [Route("api/[controller]")] [ApiController] public class ProductsController : ControllerBase { } } -
Read Products from database
As the Web API application is connected to the database through the AdventureWorks2017Context DbContext class, you need to inject dependency from the constructor of ProductsController so that the instance of AdventureWorks2017Context is accessible to all methods.
Add constructor and action method code to ProductsController as
private readonly AdventureWorks2017Context _context;

public ProductsController(AdventureWorks2017Context Context)
{
    this._context = Context;
}

[HttpGet("GetAllProducts")]
public List<Product> GetAllProducts()
{
    return _context.Products.ToList();
}
Add SQL Connection string
Add connection string configuration in appsettings.json file.
"ConnectionStrings": { "GeekStore": "Data Source=<servername> Initial Catalog=AdventureWorks2017;Integrated Security=True" } -
Update Program.cs
Program.cs has startup code that adds required services, and dependencies and builds the app.
As connection string is stored in appsettings.json file you can use builder.Configuration to get required connection string.
Add highlighted code in Program.cs file.
var builder = WebApplication.CreateBuilder(args);

var connectionString =
    builder.Configuration.GetConnectionString("GeekStore");

builder.Services.AddDbContext<AdventureWorks2017Context>(options => {
    options.UseSqlServer(connectionString);
});
CORS Policy
To make Web API accessible to authorized clients you need to define an accurate CORS policy. For more details see ASP.NET Web API CORS Policy.
Add highlighted code to Program.cs file.
var builder = WebApplication.CreateBuilder(args);

builder.Services.AddCors(options =>
{
    options.AddDefaultPolicy(
        policy =>
        {
            policy.AllowAnyOrigin()
                .AllowAnyHeader()
                .AllowAnyMethod();
        });
});

var app = builder.Build();

app.UseCors();
AddControllers
Add services related to Controllers to IServiceCollection. AddControllers() takes care of registering the MVC framework dependencies and discovering our controllers. Then call app.MapControllers() to register controller routes and the middleware.
Add highlighted code to program.cs file.
var builder = WebApplication.CreateBuilder(args); builder.Services.AddControllers(); var app = builder.Build(); app.MapControllers(); -
Test Web API using Swagger
Swagger is a set of tools that helps to generate API documents and testing. Swagger generates information for each public method of service. Swagger UI provides web based UI interface for service.
You can test any public service method using Swagger. You can also test Web API methods using Postman.
Install this NuGet package to GeekStore Web API.
Install-Package Swashbuckle.AspNetCoreMostly Swagger is used in the development environment. Add this code to Program.cs file.
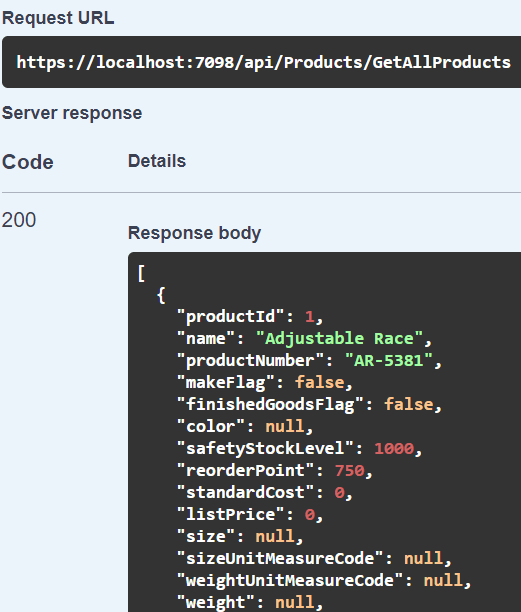
var app = builder.Build();

if (app.Environment.IsDevelopment())
{
    app.UseSwagger();
    app.UseSwaggerUI();
}
Run your GeekStore Web API in the browser by pressing F5. The browser shows Swagger UI with Schema of GetAllProducts method -> click on Try it Out -> Execute.
Execute button executes the GetAllProducts Web API method and fetch all products from AdventureWorks2017 SQL server database.

Blog Search

-
Building Scalable Applications: Microservice Architecture Challenges
-
The Paradigm Shift to Low-Code and No-Code Development in Software Engineering
-
How To Use AutoMapper in ASP.NET Core Web API
-
Generate Log using Serilog And Seq In ASP.NET Core MVC 6
-
How to Setup CORS Policies in ASP.NET Core Web API
Its very useful. Thanks.