jQuery AJAX AutoComplete in ASP.NET MVC Core
by GeeksArray
This tutorial explains how to use the jQuery AJAX AutoComplete feature in your ASP.NET MVC Core application. For this, you will use Visual Studio 2019, NET5, EF Core, Web API controller, and AdventureWorks database of SQL Server.
You will use jQuery AJAX call to Web API controller and render JSON result. This also explains how to secure your AJAX requests using AntiForgeryToken.
-
Create Database and Tables
For this tutorial, we will use data from [Purchasing].[Vendor] table of AdventureWorks2017 database. AdventureWorks is a sample database provided by Microsoft. This database is for the eCommerce application of the Bicycle store.
You can download the script from the AdventureWorks2017 database and create a database.
ASP.NET core application will get Vendor names from this database through jQuery AJAX call triggered by Autocomplete textbox.
-
Create .Net5 MVC Core application
Open your visual studio 2019 and create a new Project of ASP.NET Core Web Application -> Give name to application jQuery AJAX AutoComplete -> Click Create -> From next Dialog box select ASP.Net Core Web App(Model-View-Controller) -> Select .NET Core and ASP.NET Core respective dropdowns located at top of the window -> click Create.
This creates an ASP.NET MVC Core application with a default file structure having HomeController, Index.cshtml, and layout page. You can go through the Create ASP.NET MVC Core Application.NET5 for a more detailed description and steps.
-
Connectionstring for SQL Server DB
To connect your application to the SQL database you will have to add a connection string in the appsettings.json file. This connectionstring will be used by EF Core DataContext to fetch vendor names.
Open appsettings.json and add the following code to it. Replace your actual SQL Server name in the connection string.
{ "Logging": { "LogLevel": { "Default": "Information", "Microsoft": "Warning", "Microsoft.Hosting.Lifetime": "Information" } }, "AllowedHosts": "*", "ConnectionStrings": { "DefaultConnection": "Data Source=<your server name> Initial Catalog=AdventureWorks2017;Integrated Security=True" } } -
Create ASP.NET MVC Area
The MVC Area is the ASP.NET MVC feature to organize large applications into smaller logical groups. Each group will have its own components like Controller, Views, and models. In the eCommerce application, you will have areas like Customer, Order, Billing, etc. For this tutorial, you will create an area with the name Purchasing.
From Solution Explorer right-click on Web application name -> Select Add -> New Scaffold Item -> Select MVC Area -> Click on Add -> Enter Area Name Purchasing and click Add. This creates the Controllers, Data, Models, Views folder under Purchasing Area.
From Solution Explorer right click on Web application name -> Select Add -> New Scaffold Item -> Select MVC Area -> Click on Add -> Enter Area Name Purchasing and click Add. This creates Controllers, Data, Models, Views folder under Purchasing Area.
-
Add Model and DataContext
In this step, you will add a Model and DataContext of Entity Framework for Vendor to fetch data from the database to show on Autocomplete textbox. Add a class file with the name Vendor.cs under Purchasing -> Models folder.
Add the following properties of the Vendor model. In the database, the Vendor table belongs to the Purchasing schema so we are using DataAnnotations to specify schema and tablename. For a more detailed description of DataAnnotations visit EF Core DataAnnotations
--Vendor.cs

using System.ComponentModel.DataAnnotations;
using System.ComponentModel.DataAnnotations.Schema;

namespace jquery_autocomplete_aspnet_mvc_core.Areas.Purchasing.Models
{
    [Table("Vendor", Schema = "Purchasing")]
    public class Vendor
    {
        [Key]
        public int BusinessEntityID { get; set; }

        public string AccountNumber { get; set; }

        public string Name { get; set; }

    }
}
To use Entity Framework for creating DataContext install the following Nuget packages through NuGet Package Manager or Nuget Package Console.
Install-Package  Microsoft.EntityFrameworkCore

Install-Package Microsoft.EntityFrameworkCore

Install-Package Microsoft.Extensions.Configuration
Now you will create a DataContext to configure the Vendor model and SQL server connection. DataContext class is the main entry point for LINQ to SQL framework. Under Purchasing -> Model folder add new class with name VendorContext.cs. Inherit this from DbContext as shown in the following code.
--VendorContext.cs using Microsoft.EntityFrameworkCore; using Microsoft.Extensions.Configuration; using System.IO; namespace jquery_autocomplete_aspnet_mvc_core.Areas.Purchasing.Models { public class VendorContext : DbContext { protected override void OnConfiguring (DbContextOptionsBuilder optionsBuilder) { var builder = new ConfigurationBuilder() .SetBasePath(Directory.GetCurrentDirectory()) .AddJsonFile("appsettings.json"); var configuration = builder.Build(); optionsBuilder.UseSqlServer (configuration["ConnectionStrings:DefaultConnection"]); } public DbSetVendors { get; set; } } } -
Web API Controller
In this step, you will create an ASP.NET Core Web API Controller. Web API Controllers are derived from ControllerBase. These Web APIs can be called by any client through HTTP/s calls.
For this tutorial, we will create VendorAPIController and write a search Web API method to search Vendor names on request of AutoComplete textbox. This method will be executed on the jQuery AJAX call.
Right-click on Areas -> Purchasing -> Controllers folder and select Add -> New Item. From the Add New Item, dialog box selects API Controller. Name it as VendorAPIController.

Add the following code to VendorAPIController.
using Microsoft.AspNetCore.Http;
using Microsoft.AspNetCore.Mvc;
using System;
using System.Linq;
using System.Threading.Tasks;
using Microsoft.EntityFrameworkCore;
using jquery_autocomplete_aspnet_mvc_core.Areas.Purchasing.Models;

namespace jquery_autocomplete_aspnet_mvc_core.
    Areas.Purchasing.Controllers
{
[Route("api/vendor")]
[ApiController]
public class VendorAPIController : ControllerBase
{
    private VendorContext db = new VendorContext();

    [Produces("application/json")]
    [HttpGet("search")]
    [Route("api/vendor/search")]
    public async Task<IActionResult> Search()
    {
        try
        {
            string term = HttpContext.Request.Query["term"].ToString();

            var names = db.Vendors.Where(p => p.Name.Contains(term))
                    .Select(p => p.Name).ToListAsync();
            return Ok(await names);
        }
        catch(Exception ex)
        {
            return BadRequest();
        }
    }
}
}
Notice that attribute Route created for Controller and Search Web API method. This method uses VendorContext created in the previous method, the value term is read from HttpContext. Vendor names containing characters from the term are fetched from the database and return as JSON.
-
MVC Controller
Add an MVC controller to accept and respond to requests for Vendor view. Right-click on Areas -> Purchasing -> Controllers folder and select Add -> New Item. From the Add New Item, the dialog box selects MVC Controller. Name it as VendorController.
Add following code to VendorController
using Microsoft.AspNetCore.Mvc;

namespace jquery_autocomplete_aspnet_mvc_core
    .Areas.Purchasing.Controllers
{
    [Area("purchasing")]
    public class VendorController : Controller
    {
        [Route("/vendor/VendorOrders")]
        public IActionResult VendorOrders()
        {
            return View();
        }
    }
}
Notice Area attribute of controller and MVC Route attribute of Action method, that helps to route your request to specific MVC Action Method. The action method VendorOrders returns View that displays html of Vendor page.
The action method VendorOrders returns View that displays HTML of Vendor page.
-
Vendor View
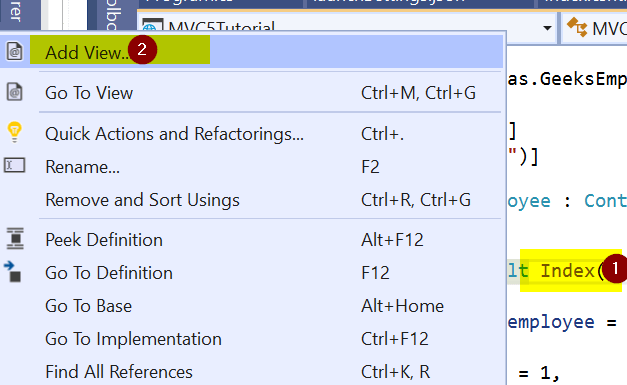
Add a MVC View to display Vendor details by right clicking on VenorOrders action method of VendorController, and select Add View(shown in below picture) -> Select Razor View -> name it as VendorOrders.cshtml.
Add following html code to VendorOrders.cshtml
@{ ViewData["Title"] = "Vendor Orders"; Layout = "~/Views/Shared/_Layout.cshtml"; } <h1>AutoComplete in ASP.NET Core MVC</h1> <div> <br /> <br /> <dl class="row"> <dt > <span>Vendor Name</span> </dt> <dd class="col-sm-8"> <input type="text" id="vendorName" placeholder="Enter Vendor Name" /> </dd> </dl> </div> <div> You selected Vendor: <b><span id="lblVendorName"></span></b> </div> -
jQuery AJAX for AutoComplete textbox
Finally, in this step, you will write a jQuery AJAX method for the VendorName AutoComplete text box. As a best practice, you will write javascript code in the separate .js file. Open site.js file located at wwwroot -> js -> site.js. Add the below code to it. This code triggers when a user enters a minimum of 3 characters in the VendorName text box.
$(document).ready(function () {
$("#vendorName").autocomplete({
    source: function (request, response) {
    $.ajax({
        url: '/api/vendor/search',
        headers: { "RequestVerificationToken":
                $('input[name="__RequestVerificationToken"]').val() },
        data: { "term": request.term },
        dataType: "json",
        success: function (data) {
            response($.map(data, function (item) {
                return item;
            }))
        },
        error: function (xhr, textStatus, error) {
            alert(xhr.statusText);
        },
        failure: function (response) {
            alert("failure " + response.responseText);
        }
    });
    },
    select: function (e, i) {
        $("#lblVendorName").text(i.item.value);
    },
    minLength: 3
});
});
Following are details of each parameter and its value.
- url: URL to get a resultset. The value is set to the Search Web API method from VendorAPIController.
- headers: added AntiForgeryToken value to the header of request.
- data: the term which is to be searched to get vendor names.
- dataType: AJAX request will recieve response in JSON.
- success: a method to handle response if AJAX call is successful.
- error: a method to handle response if AJAX call receives an error.
- failure: a method to handle response if AJAX call receives failure.
- select: an event to trigger when you select any value from suggested values from AutoComplete suggestion. Here when the user selects some vendor name that will be displayed in different span.
- minLength: Minimum number of characters to be entered before jQuery AJAX call starts execution.
-
_Layout page
_Layout.cshtmlpage is a master page that contains common UI portions like the main menu, footer, login/register functionality, refer common scripts, CSS files so that you do not need to repeat in every other page. The _Layout page from Views -> Shared folder is being referred in VendorOrders.cshtml. We will add site.js and other jquery related js and CSS files to the _Layout page..
Open _Layout.cshtml from Views -> Shared folder and update following code in the head part of _Layout page. Notice reference to jquery-ui.css file. This file gives required CSS to render jQuery Autocomplete and it's selection.
<head>
    <meta charset="utf-8" />
    <meta name="viewport" content="width=device-width, initial-scale=1.0" />
    <title>@ViewData["Title"] - jquery_autocomplete_aspnet_mvc_core</title>
    <link rel="stylesheet" href="https://code.jquery.com/ui/1.12.1/themes/base/jquery-ui.css">
    <link rel="stylesheet" href="~/lib/bootstrap/dist/css/bootstrap.min.css" />
    <link rel="stylesheet" href="~/css/site.css" />
</head>
Add reference of following scripts after footer tag in _Layout.cshtml. Notice reference of site.js having code of jQuery AJAX call and jquery.ui.min.js file.
<script src="~/lib/jquery/dist/jquery.min.js"></script>
<script src="~/lib/bootstrap/dist/js/bootstrap.bundle.min.js"></script>
<script src="https://code.jquery.com/ui/1.12.1/jquery-ui.min.js"></script>
<script src="~/js/site.js" asp-append-version="true"></script>
-
Securing jQuery AJAX request
We can add AntiForgeryToken to prevent CSRF attacks. AntiForgeryToken generates a form field and it is validated on every form submission. To secure the jQuery AJAX calls to server or API, you need to add AntiForgeryToken to AJAX request header.
Open _Layout.cshtml from Views -> Shared folder add following line to head part of _Layout page. This will generate a token whenever page is rendered and submitted to server on form submission.
@Html.AntiForgeryToken()
In step 9, you already have added an AntiForgeryToken value to the jQuery AJAX call of the AutoComplete text box. The following line shows the addition of tokens in the jQuery AJAX call.
headers: { "RequestVerificationToken": $('input[name="__RequestVerificationToken"]').val() },To validate this token on the server-side, the Web API method should be decorated with [ValidateAntiForgeryToken] as shown in the following code.
[ValidateAntiForgeryToken] public async Task
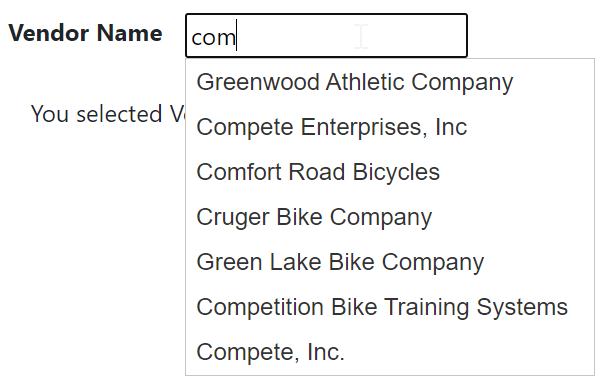
Search() { --code to fetch data from database using DBContext } Your VendorName textbox is ready with the AutoComplete feature triggered using jQuery AJAX call. Run your application and navigate to https://localhost:<port number>/vendor/VendorOrders. Enter atleast 3 characters in VendorName textbox it should display the following result..

Blog Search

-
Building Scalable Applications: Microservice Architecture Challenges
-
The Paradigm Shift to Low-Code and No-Code Development in Software Engineering
-
How To Use AutoMapper in ASP.NET Core Web API
-
Generate Log using Serilog And Seq In ASP.NET Core MVC 6
-
How to Setup CORS Policies in ASP.NET Core Web API