.NET Core Dependency Injection Object Lifetime
In .NET Core, you can register dependencies using three different methods AddSingleton, AddTransient, and AddScoped. This blog explains each of these methods.
Objects injected using Dependency Injection have a specific lifetime. Object's lifetime depends on how you register dependency. To understand how each method is different from than others we will create a console application, and service and inject this service to application middleware.
-
Create Console Application
Open visual studio and Create a new Console application from File -> New Project -> Console App -> project name as DI-Objects -> set location of your choice -> click on Next -> Select Framework as per your requirement -> Click on Create.
For this blog, I am using .NET Core 6. You can use whatever is available for you, also you may create a Web API or ASP.NET MVC application rather than a console application.
Create Interface
The interface is not required for Dependency Injection, however, DI is much more useful with the interface. For more information see How To Implement Dependency Injection In .Net Core
Create an interface with the name IService and add the below code to it.
namespace DI_Objects
{
    internal interface IService
    {
        public string GetObjectCreationDateTime { get; }
    }
}
Create Service
In this step, you will create a Service that implements the IService interface. It has property GetObjectCreationDateTime will return value of Object Creation date time stamp.
The use of created object differs on the method you use for injecting dependency of class. You can use AddSingleton, AddTransient, and AddScoped methods.
Create a new class with the name Service.cs for the application. Implement the IService interface as shown in the below code.
namespace DI_Objects
{
    internal class Service : IService
    {
        string _currentDateTime;
        public Service()
        {
            this._currentDateTime
                = DateTime.Now.ToString("MMMM-dd hh.mm.ss.ffffff");
        }

        public string GetObjectCreationDateTime
        {
            get { return this._currentDateTime; }
        }
    }
}
So whenever an object of the Service class is created it records the timestamp in variable _currentDateTime.
AddSingleton
Singleton objects are the same for every object and every request. IoC container creates and shares a single instance of service with all requests of application. The container will have the service instance until the container itself is disposed of.
Instantiating service as Singleton is ideal for implementing caching frameworks, or configuring some static values, configuration or logging.
Singleton instances are the most memory efficient and they have a longer lifetime.
Open Program.cs file and inject dependency of Service class as shown below.
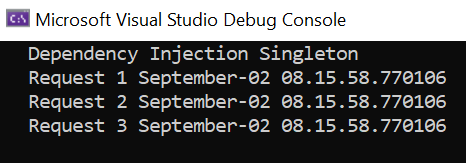
var serviceProvider = new ServiceCollection()
            .AddSingleton<IService, Service>()
            .BuildServiceProvider();

Console.WriteLine("Dependency Injection Singleton");
var serviceObject1 = serviceProvider.GetService<IService>();
Console.WriteLine($"Request 1 {serviceObject1.GetObjectCreationDateTime} ");

var serviceObject2 = serviceProvider.GetService<IService>();
Console.WriteLine($"Request 2 {serviceObject2.GetObjectCreationDateTime} ");

for (int i = 0; i < 5000; i++) ;
var serviceObject3 = serviceProvider.GetService<IService>();
Console.WriteLine($"Request 3 {serviceObject3.GetObjectCreationDateTime} ");
Run your console application, you will see all requests get the same timestamp. This happened because the Service class instance is created on Request 1 and the same instance is shared with Request 2 and Request 3, as the instance was not disposed of before Request 2 and Request 3.
-
AddTransient
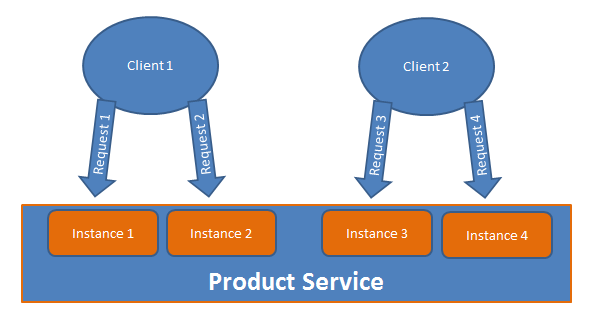
The Transient services always create a new instance, every time the client requests it. The cost of creating an instance and disposing them is overhead, however, Transient objects have a shorter lifetime.
Transient instance works best in multi-threading scenarios. HttpClient is an example of a Transient instance when a client calls a service using the HttpClient service provides a new instance.
This picture shows the execution of Transient Instance
Use this code to create a Transient instance of the Service class.
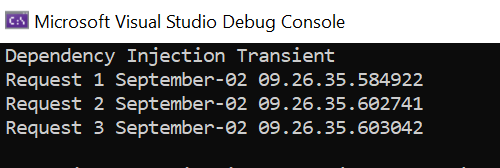
var serviceProvider = new ServiceCollection()
            .AddTransient<IService, Service>()
            .BuildServiceProvider();

Console.WriteLine("Dependency Injection Transient");
var serviceObject1 = serviceProvider.GetService<IService>();
Console.WriteLine($"Request 1 {serviceObject1.GetObjectCreationDateTime} ");

for (int i = 0; i <5000; i++);

var serviceObject2 = serviceProvider.GetService<IService>();
Console.WriteLine($"Request 2 {serviceObject2.GetObjectCreationDateTime} ");


for (int i = 0; i< 5000; i++) ;
var serviceObject3 = serviceProvider.GetService();
Console.WriteLine($"Request 3 {serviceObject3.GetObjectCreationDateTime} ");
Run your application, and you will see 3 different requests with different instance creation time stamps.
-
AddScoped
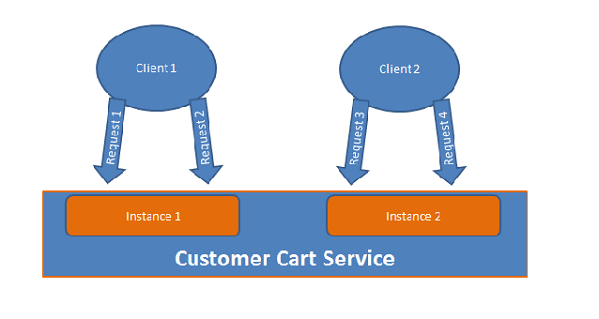
Scoped instances are created once per request, these are same within request but different for different instance. Scoped instances can be considered as singleton in same scope.
The dependent service instance is created at the beginning of the request, injected into all required dependencies, and disposed of at the end of the request.
Scoped instances are ideal when you want to share the same instance from the same client. Consider a scenario where you have different microservices for getting order and order discount details. The client application creates an instance of Customer and passes to Order and Discount services. Here as the same Customer objects need to use you can instantiate as Scoped.
This picture shows the execution of Scoped Instance.
To understand how to use the AddScoped method to inject dependency update your program.cs file as shown below.
var serviceProvider = new ServiceCollection()
            .AddScoped<IService, Service>()
            .BuildServiceProvider();


Console.WriteLine("Dependency Injection Scoped");
Console.WriteLine("Scope 1");

using (var scope = serviceProvider.CreateScope())
{
    Console.WriteLine(scope.ServiceProvider.
        GetService<IService>().GetObjectCreationDateTime);

    for (int i = 0; i < 5000; i++) ;

    Console.WriteLine(scope.ServiceProvider.
        GetService<IService>().GetObjectCreationDateTime);
}

Console.WriteLine("Scope 2");
using (var scope = serviceProvider.CreateScope())
{
    Console.WriteLine(scope.ServiceProvider.
        GetService<IService>().GetObjectCreationDateTime);

    for (int i = 0; i < 5000; i++) ;

    Console.WriteLine(scope.ServiceProvider.
        GetService<IService>().GetObjectCreationDateTime);
}
This code creates two different scopes, each scope calls Service two times. For the first call of Scope 1 and Scope 2, a Service instance is created for a subsequent calls within scope same instance is returned.
Run the application and see the result. For two request of Scope 1 same DateTime stamp is shown, similarly for Scope 2.


Blog Search

-
Building Scalable Applications: Microservice Architecture Challenges
-
The Paradigm Shift to Low-Code and No-Code Development in Software Engineering
-
How To Use AutoMapper in ASP.NET Core Web API
-
Generate Log using Serilog And Seq In ASP.NET Core MVC 6
-
How to Setup CORS Policies in ASP.NET Core Web API