Access SQL server database from .NET Core Console Application
by GeeksArray
This blogpost explains how to connect .NET Core Console application to SQL server database and read table data. You will not be using the Entity framework for this. You will Inject Dependency of IConfiguration to read appsettings.
The prerequisite for this is Visual Studio or above and SQL Server or above with required execution permission. If you don't have you can download from Visual Studio 2019 and SQL Server
-
Create AdventureWorks Database
For this tutorial, you will create AdventureWorks database by executing SQL script. AdventureWorks database is a sample database to manage cycle business provided by Microsoft. We will read data from [HumanResources].[Department] table and show it on the dot net console.
You can download create database script from AdventureWorks2017.
-
Create .Net Core Console Application
Open your Visual Studio and create a .Net Core Console application. Select File menu -> New -> Project -> Console App (.NET Core). Name application as AdventureData or anything as your choice.
Console applications generate exe file which you can execute on-demand or schedule automatic execution using Windows service or Task Scheduler.
-
Create appsettings.json
.NET Core console application does not have any config or appsettings file by default. So add a appsettings file by Right click on solution -> New Item -> JavaScript JSON configuration file (from Visual C# items) -> Name it as appsettings.json -> click Ok.
When your class files or dependent class libraries try to read settings from appsettings.json, this file should be available in the bin directory. For this, you will have to change the setting for Copy To Output Directory as Copy always.
Right click appsettings.json -> properties -> set Copy To Output Directory as Copy always.
Add an SQL connection string to the appsettings.json as shown in the below code. Keep the exclude configuration generated by .Net Core as it is.
{ "exclude": [ ], "ConnectionStrings": { "Default": "Data Source=DESKTOP-1NKM2FU; Initial Catalog=AdventureWorks2017; Integrated Security=True" } } -
Install NuGet packages
Now install required NuGet packages by right click on AdventureData console project -> select Manage NuGet Packages -> Browse
Browse for below packages and install them.
- Microsoft.Extensions.Configuration
- Microsoft.Extensions.Configuration.FileExtensions
- Microsoft.Extensions.Configuration.Json
- System.Data.SqlClient
-
Create Department Model
In this step, you will create a Department model to provide loosely coupled access to SQL server data. Add a new folder to AdventureData console application with name Models.
You can generate models for all tables from existing database using EF Core database first
Add a class to Models folder with name department.cs and add properties to it as shown below.
namespace AdventureData.Models { public class Department { public int DepartmentID { get; set; } public string Name { get; set; } public string GroupName { get; set; } public DateTime ModifiedDate { get; set; } } } -
Create DAL class
As per loosely coupled architecture, you can create a separate class or the library for accessing data from database. This will help to have However to keep simple implementation of this blog you can create a separate folder for DAL(Data Access Layer) in the same project.
Add a folder with name DAL and class to it with name DepartmentDAL.cs. This class will read connection string from appsettings.json, read data from SQL server and return list of departments to client. This tutorial the client is Program.cs file from same project.
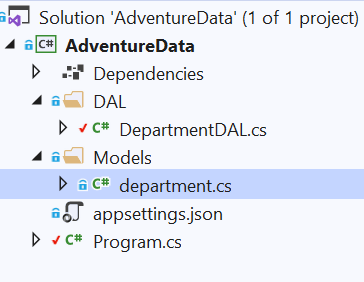
Your folder structure should look like this.
Declartion of IConfiguration
Declare a read-only variable of type IConfiguration accessible to the entire class.
Also declare a string variable for connection string that is stored in appsettings.json file.
namespace AdventureData.DAL
{
public class DepartmentDAL
{
    private readonly IConfiguration _configuration;
    private readonly string _connectionString;
}
}
Inject constructor dependency
Change the constructor code of DepartmentDAL to inject IConfiguration dependency. The client must supply dependency. Constructor code will be as:
public DepartmentDAL(IConfiguration configuration)
{
    this._configuration = configuration;
    this._connectionString = this._configuration.GetConnectionString("Default");
}
For more details see how to inject dependency of IConfiguration in dot net core application
-
Get All Departments from SQL table
Your configuration and connection string is all set for use. In this step, you will write code to get all departments code from SQL table.
The following code creates a function to fetch all departments from database and return list of Department model.
This code uses plain text SQL query to read [HumanResources].[Department] table records. If you want to use stored procedure you can mention stored procedure name instead of inline query and set cmd.CommandType = CommandType.StoredProcedure;
Code for GetAllDepartments function.
public List<department> GetAllDepartments()
{
    var lstDepartments = new List<department>();
    try
    {
        using (SqlConnection con = new SqlConnection(_connectionString))
        {
            SqlCommand cmd = new SqlCommand("SELECT * FROM [HumanResources].[Department]", con);
            cmd.CommandType = CommandType.Text;
            con.Open();
            SqlDataReader rdr = cmd.ExecuteReader();
            while (rdr.Read())
            {
                lstDepartments.Add(new department
                {
                    DepartmentID = rdr.GetInt16("DepartmentID"),
                    Name = rdr.GetString("Name"),
                    GroupName = rdr.GetString("GroupName"),
                    ModifiedDate = rdr.GetDateTime("ModifiedDate")
                });
            }
        }
    }
    catch (Exception ex)
    {
        throw ex;
    }
    return lstDepartments;
}
You can see all code of DepartmentDAL here.
-
ConfigurationBuilder from appsettings.json file
You will use ConfigurationBuilder to read settings from appsettings.json file. Microsoft.Extensions.Configuration and System.IO are required to be used for ConfigurationBuilder.
Open Program.cs file and replace existing code with following code. This code adds reference to required assembly, declare required variables, and create a static function to read appsettings.
using Microsoft.Extensions.Configuration; using System; using System.IO; using AdventureData.DAL; namespace AdventureData { class Program { private static IConfiguration _iconfiguration; static void GetAppSettingsFile() { var builder = new ConfigurationBuilder() .SetBasePath(Directory.GetCurrentDirectory()) .AddJsonFile("appsettings.json", optional: false, reloadOnChange: true); _iconfiguration = builder.Build(); } } } -
Call to Data Access Layer
We have created a DAL function which returns a list of all departments. From Program.cs you will call this DAL function to display departments on the console.
In Program.cs file create a static function with name ShowAdventureDepartments and add below code.
static void ShowAdventureDepartments()
{
    var deptDAL = new DepartmentDAL(_iconfiguration);
    var lstDepartment = deptDAL.GetAllDepartments();
    lstDepartment.ForEach(item =>
    {
        Console.WriteLine($"DeptID: {item.DepartmentID}" +
            $" Name: {item.Name}" +
            $" Grp Name: {item.GroupName}" +
            $" Date: {item.ModifiedDate}");
    });
}
You can see the entire code of Program.cs here.
The above code uses string interpolation to display result without concatenation of strings to console.
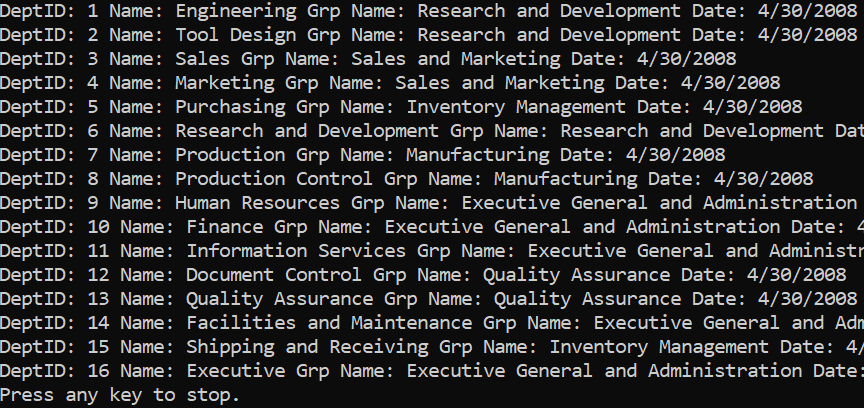
Your code is all set to show all departments from SQL table to console. Run your application by pressing F5 key and you should see result as:

Blog Search

-
Building Scalable Applications: Microservice Architecture Challenges
-
The Paradigm Shift to Low-Code and No-Code Development in Software Engineering
-
How To Use AutoMapper in ASP.NET Core Web API
-
Generate Log using Serilog And Seq In ASP.NET Core MVC 6
-
How to Setup CORS Policies in ASP.NET Core Web API