Host ASP.NET Web API in IIS using Visual Studio Publish method
This article will help you to host your ASP.NET Web API in IIS using the Visual Studio Publish method. You will use the File System publish method for it.
Hosting ASP.NET Web API
You can host ASP.NET Web API as
- Self Hosted: You can host ASP.NET Web API using HttpSelfHostServer in Console, Windows Forms, ASP.NET Web Application, ASP.NET MVC application, or in windows services.
- IIS hosting: You can host your ASP.NET Web API in IIS and use as a webserver to make it available to clients through direct HTTP calls.
Benefits of Hosting ASP.NET Web API in IIS
It works like other IIS application so it will have benefits like load balancing, remote deployments. It provides process activation and recycling capabilities which helps to increase the reliability of the application. It is easy and safer to deploy your Web API application to IIS. For a detail description of ASP.NET Web API concepts see Getting Started with ASP.NET Core Web API and Entity Framework
Steps for Hosting ASP.NET Web API in IIS
Create ASP.NET Web API
You can Create ASP.NET Web API application. The article linked with this create an Empty ASP.NET Web API solution and gives you RESTful CRUD methods.
Publish ASP.NET Web API
Open CustomerApp application created in the previous step.
Right click on CustomerApp project and select Publish. You will see Publish Web wizard.
In Profile tab -> Select New Profile from DropDownList and give profile name as CustomerAppProfile.
Next is the Connection tab -> Select File System from Publish Method DropDownList. Give path as Target Location where you would like to publish API.
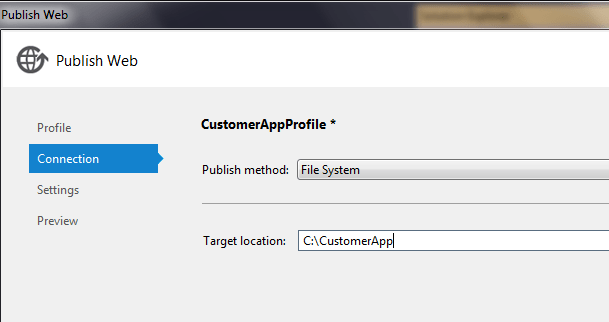
Click the Next button and select Release from Configuration DropDownList and finally click the Publish button.
Host CustomerApp in IIS
Open IIS manager by clicking Windows start -> Run -> enter inetmgr -> click ok
If IIS is not installed on your machine click here to install.
Go to IIS manager and right click on sites and select Add Web site.
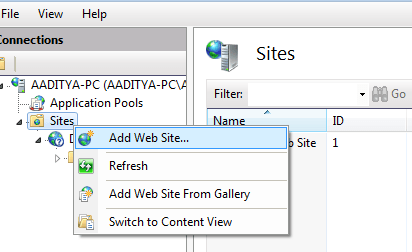
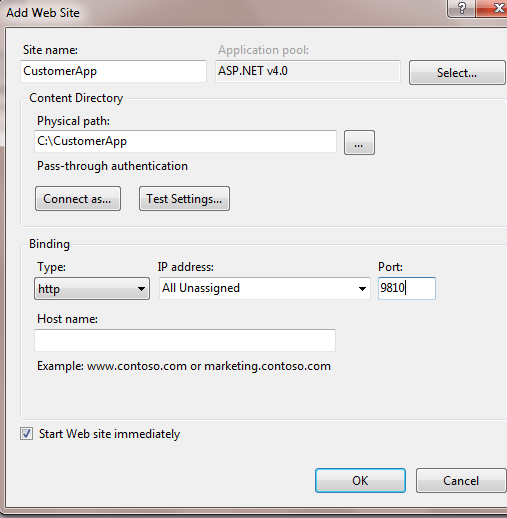
Enter details as shown in below screenshot
- Enter site name as CustomerApp
- Change the application pool to ASP.net V4.0
- Select the physical path of the folder which contains the published ASP.NET Web API. I entered as C:\CustomerApp
- Enter port number on you wish to host API. I use port as 9810.
Browse ASP.NET Web API through IIS
Your Web API is now hosted in IIS. You should be able to browse it through IIS or browser.
From IIS manager -> Select Sites -> right click on CustomerApp (created in previous step) -> Select Manage Web Site -> and select Browse.
It will redirect to http://localhost:9810. As corresponding routing URL is not mapped in CustomerApp, it will throw an IIS error.
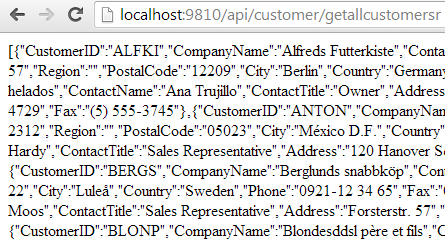
Try below URL for which route mapping has done in Web API.
    http://localhost:9810/api/customer/getallcustomersr

    http://localhost:9810/api/customer/getcustomer/anatr
You will see the below output.
Accessing Database under IIS APPPOOL\\ASP.NET v4.0
As we are using ASP.NET v4.0 App Pool make sure IIS APPPOOL\\ASP.NET v4.0 is added to your Database Server -> Security -> Logins.
If it's not there go ahead and add new login with name IIS APPPOOL\\ASP.NET v4.0 or else it will throw run time error exception Login failed for user 'IIS APPPOOL\\ASP.NET v4.0'
Blog Search

-
Building Scalable Applications: Microservice Architecture Challenges
-
The Paradigm Shift to Low-Code and No-Code Development in Software Engineering
-
How To Use AutoMapper in ASP.NET Core Web API
-
Generate Log using Serilog And Seq In ASP.NET Core MVC 6
-
How to Setup CORS Policies in ASP.NET Core Web API
I have Created this API and successfully hosted on server and do sanity with Poster, It worked. Now I want to use this API within my Web Form Project and want to use it as virtual directory.. how can i achieve this.
below article will help you to achieve your requirement https://geeksarray.com/blog/rest-based-crud-operations-with-asp-net-web-api as you are hosting web api separately from your web form application you will have to enable CORS in web api and in web form application, you can use WebClient to call web api.
Nope. No joy. I'm getting the following error: This configuration section cannot be used at this path. This happens when the section is locked at a parent level. Locking is either by default (overrideModeDefault="Deny"), or set explicitly by a location tag with overrideMode="Deny" or the legacy allowOverride="false".
Does not work. I get following error: This configuration section cannot be used at this path. This happens when the section is locked at a parent level. Locking is either by default (overrideModeDefault="Deny"), or set explicitly by a location tag with overrideMode="Deny" or the legacy allowOverride="false".
Does not work. I get following error: This configuration section cannot be used at this path. This happens when the section is locked at a parent level. Locking is either by default (overrideModeDefault="Deny"), or set explicitly by a location tag with overrideMode="Deny" or the legacy allowOverride="false".
@Nissim, you need to execute two commands from and elevated command prompt 1. %windir%/system32/inetsrv/appcmd unlock config /section:anonymousAuthentication 2. %windir%/system32/inetsrv/appcmd unlock config -section:windowsAuthentication
I did exactly as you did in the article, but an answer I have a following: IIS 10.0 Detailed Error - 404.0 - Not Found
Hello I am trying and have the same problem This configuration section cannot be used at this path. This happens when the section is locked at a parent level. Locking is either by default (overrideModeDefault="Deny"), or set explicitly by a location tag with overrideMode="Deny" or the legacy allowOverride="false". even after having executed the 2 commands