

To set up an Angular 22 development environment you need three things: a supported Node.js LTS runtime, the Angular CLI installed globally (npm install -g @angular/cli), and an editor with the Angular Language Service — VS Code being the common choice. With those in place, ng new my-app scaffolds a modern standalone, zoneless-ready workspace and ng serve runs it. This guide walks through each piece so you have a clean, current toolchain ready for real work.
Install a supported Node.js LTS
The Angular CLI only runs on the Node.js versions listed as supported for a given release. Angular 22 (mid-2026) targets the active and maintenance LTS lines — Node.js 22 and 24 (Node.js 20 reached end of life in April 2026) — and the CLI will refuse to run or print a warning on anything older or on odd-numbered "Current" builds. Node also ships the npm package manager the CLI depends on, so getting Node right is the foundation for everything else.
Rather than installing Node system-wide and fighting version conflicts across projects, use a version manager. On macOS and Linux, nvm or the faster fnm let you install and switch between versions per shell or per project:
# Install a version manager (fnm shown), then a Node LTS
fnm install 22
fnm use 22
node -v   # v22.x.x
npm -v    # 10.x.x
Commit an .nvmrc (or .node-version) file holding the version string so every contributor and your CI pipeline pin the same runtime. nvm use and fnm use both read it automatically. This single step eliminates the classic "works on my machine" build failures that come from one developer running an unsupported Node release. On Windows, nvm-windows or fnm both work; fnm is a small, fast binary that behaves the same across all three platforms.
Choose npm or pnpm
Node bundles npm, which works fine out of the box. Many teams prefer pnpm for its content-addressed store: faster installs and far less disk use across multiple Angular workspaces. Angular's CLI supports both — you pick the package manager when creating the workspace or set it afterward:
# Enable pnpm via Corepack (bundled with Node)
corepack enable
# Tell the CLI which manager to use
ng config -g cli.packageManager pnpm
Whichever you choose, keep the lockfile (package-lock.json or pnpm-lock.yaml) in version control so installs are reproducible.
Install the Angular CLI and verify it
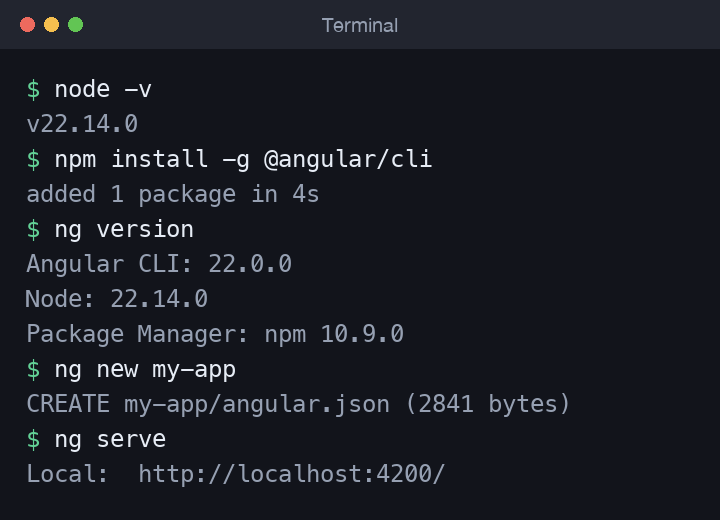
The Angular CLI is the command-line tool that scaffolds, builds, serves, tests, and upgrades Angular apps. Install it globally, then confirm the versions of the CLI, Angular packages, and Node it sees:
npm install -g @angular/cli
ng version
ng version prints the CLI version, the Angular framework packages, and your Node.js and package-manager versions in one block — the fastest way to confirm the environment is wired up correctly. You can keep the global CLI current at any time with npm install -g @angular/cli@latest.
Create your first workspace
Run ng new to scaffold a workspace. An Angular workspace is the top-level directory the CLI manages; it can hold a single application (the default) or multiple projects — several apps plus shared libraries — all governed by one angular.json. For most work a single-project workspace is what you want.
ng new my-app
cd my-app
ng serve --open
During scaffolding the CLI asks a few questions. Two matter most on Angular 22:
- Server-Side Rendering (SSR) — answer yes if you want prerendering / SSR and hydration for SEO and faster first paint; no keeps it a pure client-side SPA. You can add SSR later with
ng add @angular/ssr. - Zoneless change detection — Angular 22 offers a zoneless setup that drops
zone.jsand drives change detection through signals. Choosing it gives smaller bundles and more predictable updates; it is the recommended direction for new apps.
The generated project already uses standalone components, bootstrapApplication with an app.config.ts, and the new built-in control flow, so you start on modern idioms with no NgModules. Dependencies are wired through the inject() function and reactive state through signals — signal, computed, and effect — rather than the older decorator and RxJS-heavy patterns. If you generated the app with SSR, you also get a server.ts and prerender configuration ready to go.
Once inside the workspace, take a moment to read the folder layout: src/main.ts bootstraps the app, src/app/ holds your components, and angular.json is the single source of truth for build and serve configuration. Understanding these three files makes every later CLI command easier to reason about.
Understand the esbuild/Vite application builder
New Angular 22 workspaces use the @angular/build application builder, which compiles with esbuild and serves through a Vite-based dev server. The practical wins: dramatically faster cold builds, near-instant hot module replacement during ng serve, and built-in support for SSR and prerendering. You configure it in angular.json under the build target — output path, budgets, file replacements, and optimization all live there. There is nothing to install; it is the default for freshly generated projects.
Set up your editor
Use Visual Studio Code with the Angular Language Service extension. The Language Service gives you completion inside templates, go-to-definition across component and template, and inline diagnostics for the new @if/@for/@switch control flow and signal APIs. Add the ESLint and Prettier extensions for consistent linting and formatting. A minimal .vscode/extensions.json recommending these makes onboarding a one-click affair for teammates.
Learn the core CLI commands
A handful of ng commands cover the daily loop:
ng serve— build and serve with live reload via the Vite dev server.ng build— produce an optimized production bundle indist/.ng test— run unit tests (Angular 22 defaults to a modern runner rather than Karma).ng generate component features/profile(short:ng g c) — scaffold components, services, directives, and more.ng update— upgrade Angular and dependencies across major versions with automated migrations.
Configure environments and an API proxy
For build-time configuration, use environment files and the builder's fileReplacements, swapping environment.ts for environment.prod.ts in the production configuration. Keep secrets out of these files — anything shipped to the browser is public.
During development, avoid CORS headaches by proxying API calls through the dev server. Create a proxy.conf.json and point ng serve at it:
{
  "/api": {
    "target": "http://localhost:5000",
    "secure": false,
    "changeOrigin": true
  }
}
ng serve --proxy-config proxy.conf.json
Now a request to /api/users from your app is forwarded to your backend, and your code uses relative URLs in every environment. Because the browser only ever talks to the dev server's origin, there is no preflight or CORS configuration to maintain during development. In production, your real server or reverse proxy handles the same routing, so the application code never changes between environments.
Keep the toolchain current
Angular ships a new major roughly every six months, and ng update is how you ride that cadence safely. Run ng update with no arguments to see what is upgradable, then ng update @angular/core @angular/cli to move to the next major — the command applies schematics that migrate your code automatically. Periodically bump Node.js to a supported LTS and refresh the global CLI so your local tooling never drifts far from the framework. Doing small, frequent updates is far less painful than jumping several majors at once, and the automated migrations mean most upgrades are a review-and-commit exercise rather than a rewrite.
Key takeaways
- Install a supported Node.js LTS (20, 22, or 24 for Angular 22) and manage versions with nvm or fnm, pinned via
.nvmrc. - Install the CLI globally with
npm install -g @angular/cliand verify withng version. ng newscaffolds a standalone, zoneless-ready workspace; answer the SSR and zoneless prompts deliberately.- The default esbuild/Vite application builder gives fast builds and instant HMR with no setup.
- Use VS Code plus the Angular Language Service, and lean on
ng serve,ng build,ng test, andng generatedaily. - Proxy APIs with
proxy.conf.jsonin dev and stay current withng update.
Frequently asked questions
Which Node.js version does Angular 22 require?
Angular 22 supports the active and maintenance LTS lines — Node.js 22 and 24 (Node.js 20 reached end of life in April 2026). The CLI warns or refuses to run on unsupported or odd-numbered "Current" releases, so stick to an even-numbered LTS.
Do I still need NgModules in Angular 22?
No. New workspaces are standalone by default, bootstrapped with bootstrapApplication and an app.config.ts. NgModules still work for legacy code but are no longer the starting point.
What is zoneless change detection and should I enable it?
Zoneless mode removes zone.js and drives updates through signals, producing smaller bundles and more predictable rendering. It is the recommended choice for new Angular 22 apps, and ng new offers it as a prompt.
How do I upgrade an existing Angular project?
Run ng update to list available updates, then ng update @angular/core @angular/cli to move one major version at a time. The command runs migration schematics that rewrite affected code automatically.
Comments (0)
No comments yet — be the first to share your thoughts.