Angular Components tutorial
Angular components are classes that serve as a controller for the user interfaces using a template. @Component decorator used to define components, it provides metadata like selector, template, style and other properties which determine how the component should be processed instantiated and used at run time execution.
What is Angular Component?
Components are building blocks of any Angular application. These are like Views of MVC application. The Component provides templates of application, logic to manage data required for templates and stylesheets.
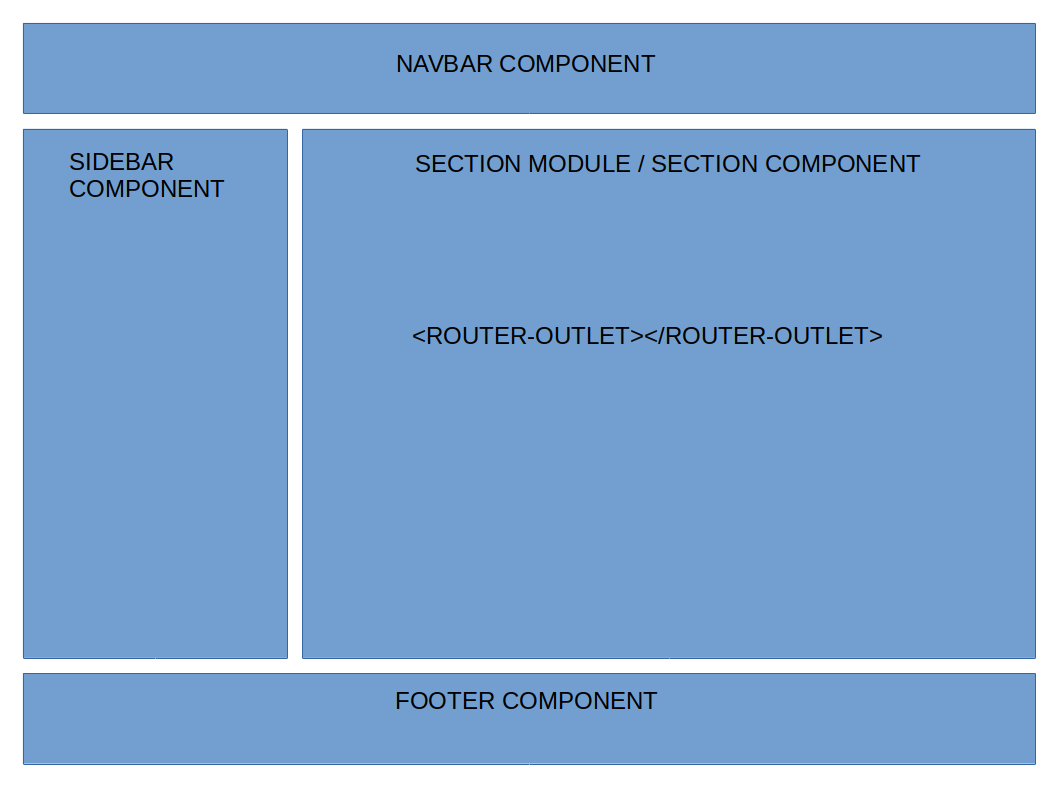
Following image shows an organized page with multiple Angular Components.

Angular Component LifeCycle
Every Angular component has a lifecycle that goes through 8 different stages. Each stage is called as lifecycle hook. As Component is TypeScript it must have a constructor which that will execute before any other lifecycle hook is executed. If you want to inject any dependency, Component's constructor is the best place for dependency injection.
After executing constructor Angular executes lifecycle hooks in below sequence
- ngOnChanges
- ngOnInit
- ngDoCheck
- ngAfterContentInit
- ngAfterContentChecked
- ngAfterViewInit
- ngAfterViewChecked
- ngOnDestroy
For more details on Angular lifecycle hooks visit - Angular Lifecycle hooks.
In this tutorial, we will create a simple Products component. you can follow below steps to create and use Products Angular component.
-
Angular application environment setup
As a prerequisite of any Angular application, you can walkthrough to setting up environement for angular which describes installing required tools, softwares to get started with Angular application.
-
Create Angular Component
Let's start to create Product Angular component to display a list of products.
You can use Angular CLI to create new component. As described in previous step, use below Angular CLI command on NodeJS command prompt to create Products component.
ng g c Products
This command stands for
g-generate
c-component
Products - Name of component
This command generates following files which are part of component metadata to manage components.
-
products.component.html
is a template file which generates html view for user. -
products.typescript.ts
has all code used by component to manage it's behavior and data. It is a TypeScript file. -
products.component.css
to manage component specific styles. -
products.component.spec.ts
Spec files are unit tests for source files. These test files run using Jasmine Javascript test framework through karma test runner.
Angular CLI command also registers Component to root module. Open app.module.ts file, Products component has referred in this file so that any other component including root can use this.
-
-
Products.TypeScript.ts
Open Products.Component.ts which is a TypeScript file and notice following decorator and events.
- Import Component and OnInit from Angular core module to create Angular component.
- The @Component decorator marks Products.Component.ts file as component and allows to set required metadata.
- The selector attribute is for naming component. So that other components can refer Products component with this specific name. It is set as app-products so other components will refer Products component as <app-products></app-products>.
- templateUrl is the URL of HTML view.
- styleUrls are path to the component specific CSS. It can be more than one.
Following code is Products Component metadata.
@Component({ selector: 'app-products', templateUrl: './products.component.html', styleUrls: ['./products.component.less'] }) -
Create a Products Dataset
In this step, you will create a simple Products JSON dataset which is nothing but an array of Products.
Open products.component.ts file and create Products array as shown below
import { Component, OnInit } from '@angular/core'; @Component({ selector: 'app-products', templateUrl: './products.component.html', styleUrls: ['./products.component.less'] }) export class ProductsComponent implements OnInit { constructor() { } ngOnInit() { } products : any[] =[ { "ProductID" :1, "ProductName": "Solid State Drive", "CategoryId":100, "AvilableQty":50, "ReorderQty":30 }, { "ProductID" : 2, "ProductName": "Monitor", "CategoryId":101, "AvilableQty":20, "ReorderQty":10 }, { "ProductID" : 3, "ProductName" : "LED Display Monitor", "CategoryId":100, "AvilableQty":5, "ReorderQty":10 }, { "ProductID" : 4, "ProductName": "San Disk 64 GB Pen Drive", "CategoryId":105, "AvilableQty":35, "ReorderQty":80 }, { "ProductID" : 5, "ProductName": "Think Pad Ultra Dock", "CategoryId":105, "AvilableQty":25, "ReorderQty":20 } ] } -
Show Products on Component HTML
To use css from Bootstrap for responsive UI let's install bootstrap by the following command on NodeJS Command prompt.
npm install bootstrapIf you get a error here like - Object Not Found - GET https://skimdb.npmjs.com/registry/Bootstrap - not_found then execute following commands from NodeJS and then again try to install bootstrap as previous step.
npm config set registry https://skimdb.npmjs.com/registry

npm cache clean
Open Styles.less file from src directory and add reference of bootstrap as shown below.
@import "~bootstrap/dist/css/bootstrap.min.css"
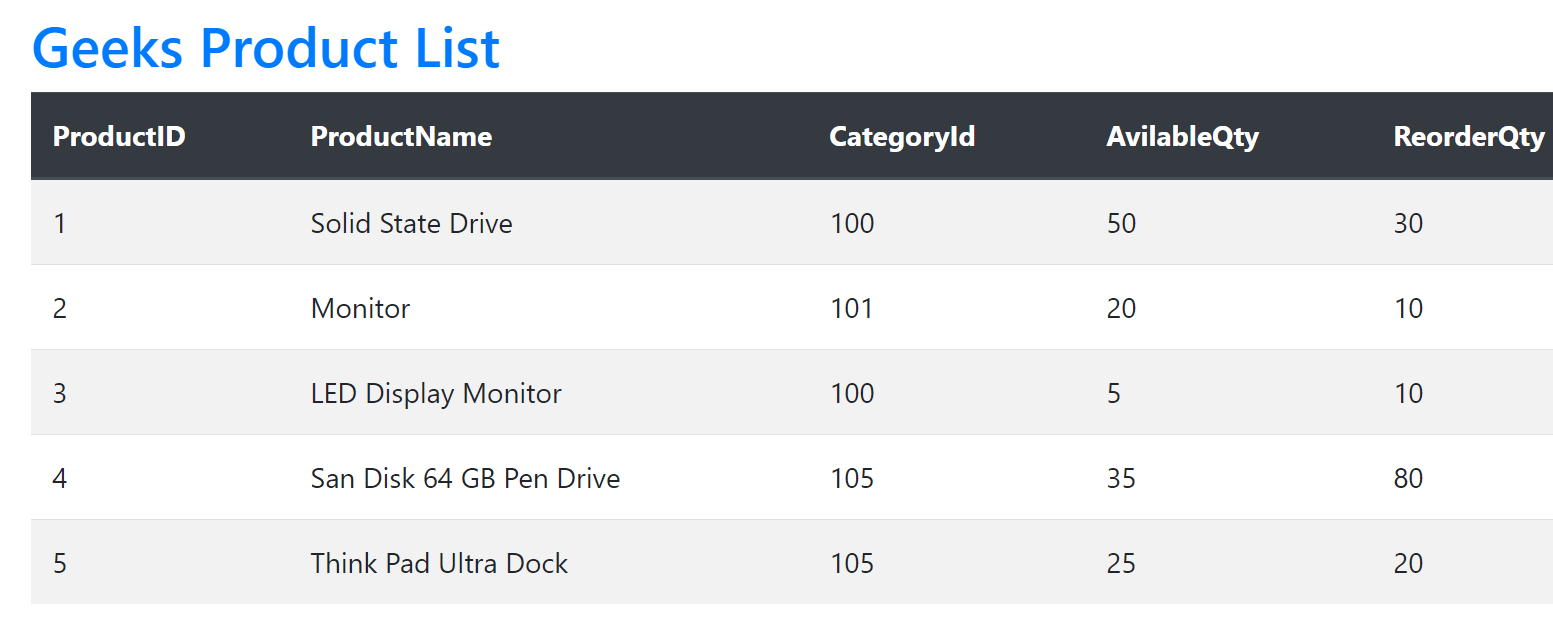
Open products.component.html and add below code. This code reads data from products JSON array located at TypeScript file.
<div class="container">
<h2>Geeks Product List</h2>
<div class="table-responsive">
    <table class="table" *ngIf='products && products.length'>
        <thead>
            <tr>
                <th>ProductID</th>
                <th>ProductName</th>
                <th>CategoryId</th>
                <th>AvilableQty</th>
                <th>ReorderQty</th>
            </tr>
        </thead>
        <tbody>
            <tr *ngFor='let product of products'>
                <td>{{product.ProductID}}</td>
                <td>{{product.ProductName}}</td>
                <td>{{product.CategoryId}}</td>
                <td>{{product.AvilableQty}}</td>
                <td>{{product.ReorderQty}}</td>
            </tr>
        </tbody>
    </table>
    <div>
    </div>
</div>
Run your application using ng serve -o

Angular component Vs Angular Directive
The Angular component is more than a directive with template. Everything you do with a directive, you can also do it with Component but not everything you do with Component is possible with a directive.
Below is the difference between Component and Directive
| Angular component | Angular directive |
|---|---|
| Use @Component meta data annotation to register component. | Use @Directive meta data annotation to register directive. |
| Using components you can break your application into smaller parts. | Using directives you can design re-usable components. |
| templateurl of template or @View decorator is mandatory in the component. | @Directive doesn't have view. |
| You can use component with pipe. | Pipe can not be used with directive. |
| Only one parent component can be present per DOM element. | Many directives can be used per DOM. |
| Components are used to create UI widgets. | Directives are used to manipulate behavior of Components. |
You can add other component as child component. For this product component you can add product-details as child component and pass data between these components using Angular nested components.
Blog Search
-
Building Scalable Applications: Microservice Architecture Challenges
-
The Paradigm Shift to Low-Code and No-Code Development in Software Engineering
-
How To Use AutoMapper in ASP.NET Core Web API
-
Generate Log using Serilog And Seq In ASP.NET Core MVC 6
-
How to Setup CORS Policies in ASP.NET Core Web API


I followed you instructutions but "ng serve -o" at the end of step 5 just brings up the default application's screen from "ng new AngularApplication". It seems the step to incorporate the products component into the app's main screen is missing. Or did I overlooked something?
product component is incorporated in step 4, in step 5 you need to add that HTML to the product products.component.html file. For more info see the code - https://github.com/geeksarray/angular-components-tutorial/tree/master/src/app/products