Getting Started with Angular and Visual Studio Code
by GeeksArray
This blog post will help you to kick off your angular development by setting up Angular application and running it using Visual Studio Code. This will also explain some Angular basics.
What is Angular?
The Angular framework is an opensource developed by Google.
The Angular is a platform and framework for building client applications in HTML and Typescript libraries. Angular framework helps you to develop SPA or Single Page Applications where your entire applications work with only one page and part of the page gets refreshed depending on the functionality required by the user.
Steps for setting up Environment for Angular App
-
Install Node.JS and NPM
Node.JS has tool NPM which allows you to download required Angular2 libraries. It is not required to install NodeJS but Without NPM or similar tool you will have to download libraries and it's dependencies manually which is really a cumbersome and time-consuming task.
To install Node.JS on your windows machine go through Install Node.Js and NPM.
Once the installation is done open Node.JS command prompt with Administrator rights from the Windows Start menu and execute below command.
Node -v

NPM -V
This command shows your current version of Node.JS and NPM installed on your machine as shown in the following pic.

-
Configure Proxy to use Angular CLI
If your organization internet is secured by the proxy server, you will have to configure your proxy details. Execute the following command with your details from Windows / Node.Js command prompt. If you are working using a personal machine and there is no proxy server you must skip this step.
npm config set proxy http://username:password@proxy.domain.com:xxxx/

npm config set https-proxy http://username:password@proxy.domain.com:xxxx/
-
Install Angular CLI
Angular CLI stands for Command Line Interface. It is a command line tool for creating and managing Angular applications. Angular CLI will help you to install and configure all required dependencies.
From Node.Js command prompt execute the following command
npm install -g @angular/cli
-
Install Visual Studio Code
Visual Studio Code is an open source, free code editor that can be used with different programming languages like Angular, NodeJS, Java, JavaScript, C#, etc. VS Code can be integrated with git. You can install VS code using this link.
This will help you in detail to set up an Angular environment.
Steps to Create Angular Application using VS Code
-
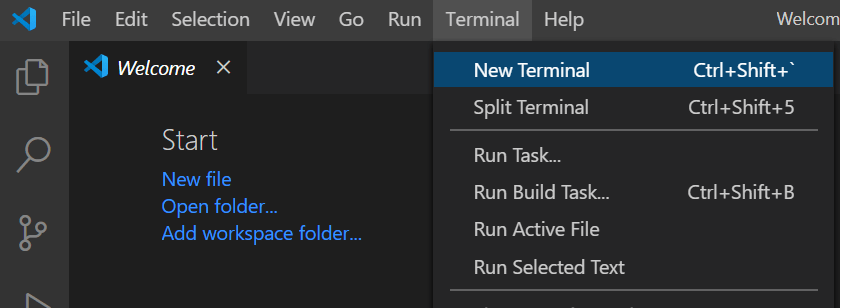
VS Code Integrated Terminal
Open Visual Studio Code -> Terminal -> New Terminal. It shows a terminal at the bottom of VS Code window. Using this terminal you can execute Angular CLI commands.
-
ng new FirstAngularApp
In this step, you will create an Angular application. Execute below Angular CLI commands in sequence in VS Code terminal.
- mkdir AngularApp
- AngularApp
- ng new FirstAngularApp
The first command creates a directory with name AngularApp, the second command navigates terminal pointer to newly created command and the third command creates a new Angular Application.
You will see a question - Would you like to add angular routing? Enter 'Y' to add a routing module to the application.
The next question will be - Which StyleSheet format would you like to use? Select LESS by arrow keys and press enter.
This will take few minutes to install all required dependencies, once it is done you should be able to compile and execute FirstAngularApp application.
-
Launch FirstAngularApp
Now your application is ready with default configuration, Angular Component, Angular directives, modules. Using below command you will navigate to application directory.
cd FirstAngularAppFollowing Angular CLI command will launch your application in your default browser. Execute this command in the terminal.
ng serve -oAngular will compile application and launch it in browser. Check your browser having url http://localhost:4200, your FirstAngularApp is launched there. Angular uses 4200 as the default port. If you want to use different port execute below CLI command on VS code terminal.
ng serve --port 5000 -o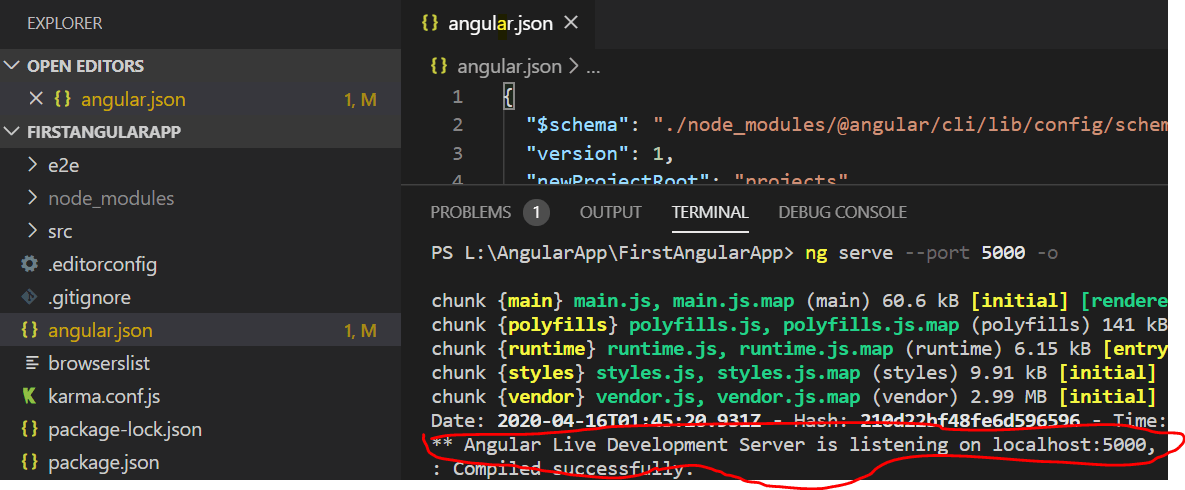
-
Update code files in VS Code
Once you launch Angular application, the terminal still shows the previous command and it will not let you execute any other CLI command. To stop your angular application use the following command.
ctrl +cThis command will ask you to Terminate batch job(Y/N)?. Type Y and press Enter key.
To update angular components, directives or modules use below CLI command.
code . -
Edit Angular Component with custom message
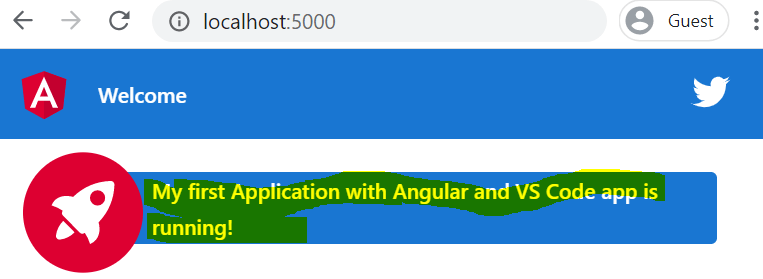
In this step, you will edit the component to display custom message on home page of the FirstAngularApp application. From Visual Studio Code, open src -> app -> app.component.ts file. This file has TypeScript code with @Component decorator.
Replace code title = 'FirstAngularApp'; with title = 'My first Application with Angular and VS Code'; and launch the application by ng serve -o
To customize or add more features to your application use Angular Component, Angular Directives, Modules.
Blog Search

-
Building Scalable Applications: Microservice Architecture Challenges
-
The Paradigm Shift to Low-Code and No-Code Development in Software Engineering
-
How To Use AutoMapper in ASP.NET Core Web API
-
Generate Log using Serilog And Seq In ASP.NET Core MVC 6
-
How to Setup CORS Policies in ASP.NET Core Web API