Implement Repository Pattern with ASP.NET Core Web API
This blog explains how to implement a Repository Pattern with ASP.NET Web API, AutoMapper, Entity Framework, CRUD operations, and async operations.
Repository Pattern
A repository pattern is an abstraction that isolates business logic from the database access layer resulting in a decoupled architecture. Repositories hide logic that involves communication with the data store. Repository Pattern provides low-level abstraction.
You would usually have one repository per entity, for example, to perform CRUD operations on a Category entity you will have CategoryRepository.
Advantages of Repository Pattern
- Dependency Injection: you can inject interface dependency and mock repository, this increases the testability of your code. Directly using DBContext of EF Core in API Controller is not testable. For more details on Dependency Injection
-
Decouples Persistence Framework
Using Repository Pattern, it is easy to change the persistence framework for example from EF Core to Dapper or something else. So DataAccess Layer and Business Layer can be tested separately.
- Minimize Duplicate Query Logic
If you have this code to get a list of products. Whenever you need a list of products you will have to repeat the same four lines of code.
_context.Products
   .Where(p => p.Id = categoryId)
   .Orderby(p.ProductId)
   .Take(10);
With Repository, you can encapsulate this code to Repository and from controller just use it like this.
_productRepository.GetProductsByCategoryId(categoryId);
Steps to Implement Repository Pattern
Setting up Application
-
Create Database
For this tutorial, we will be using a SQL database having Category as a table. Web API will perform CRUD operations on this database. Create a SQL database with the name GeekStore. You can download Create GeekStore database SQL script.
Update the connection string in appsettings.json
"ConnectionStrings": {
    "GeekStoreConnection": "Data Source=<servername>
        Initial Catalog=GeekStore;Integrated Security=True"
}
Create ASP.NET Core Web API
Create ASP.NET Core Web API application with the name GeekStore, you can use any version of Visual Studio and .NET. The code in this blog uses Visual Studio 2022 and .NET 7. For more detailed steps please visit Create ASP.NET Core Web API with Entity Framework.
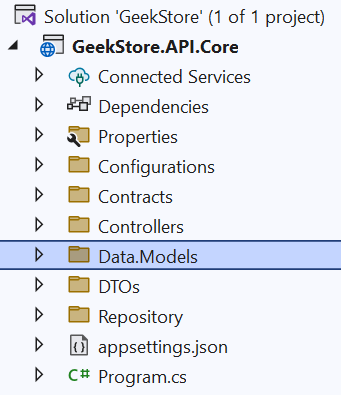
Create folders as shown
- Configurations: for AutoMapper Configuration.
- Contracts: for Repository Contracts.
- Controllers: for API Controllers.
- Data.Models: for Domain Models generated by EF Core.
- DTOs: for Data Transfer Objects.
- Repository: for repository classes.
Register DbContext in program.cs.
var builder = WebApplication.CreateBuilder(args);

var connectionString =
    builder.Configuration.GetConnectionString("GeekStore");

builder.Services.AddDbContext<GeeksStoreContext>(options => {
    options.UseSqlServer(connectionString);
});
Install NuGet Packages
As we are using Entity Framework and AutoMapper to perform CRUD operations. Install the following required NuGet packages.
- Microsoft.EntityFrameworkCore
- Microsoft.EntityFrameworkCore.Sqlserver
- Microsoft.EntityFrameworkCore.Tools
- AutoMapper
- AutoMapper.Extensions.Microsoft.DependencyInjection
Generate Data Model
You can generate database models using EF Core Database first. Use this command in Package Manager Console to generate Data Models
Scaffold-DbContext "Data Source=<servername>
        Initial Catalog=GeekStore;Integrated Security=True"
    -Provider Microsoft.EntityFrameworkCore.SqlServer
    -OutputDir Data.Models
Generated Models will be available in Data.Models folder
.
-
Create Interface
Having Interface contracts with a Repository helps for unit testing the business layer as the interface is not dependent on database or setup of the database structure.
Also, you can have multiple implementations of Interface, you might have a separate Repository for the GeekStore online application and a back office of GeekStore that implements Interface contract.
Add a new interface with the name ICategoryRepository to the folder Contracts. And add all required CRUD operation definitions.
using GeekStore.API.Core.Data.Models;

namespace GeekStore.API.Core.Contracts
{
    public interface ICategoryRepository
    {
        Task<Category> GetAsync(int? categoryId);

        Task<List<Categorygt>> GetAllAsync();

        Task<Category> CreateAsync(Category category);

        Task DeleteAsync(int categoryId);

        Task UpdateAsync(Category category);
    }
}
Create Repository Class
The repository class implements an interface contract and encapsulates the logic required to access data sources. It is responsible for retrieving data in the form of Entity models.
Add a new class with name the CategoryRepository.cs to the folder Repository. This class implements the ICategoryRepository contract.
namespace GeekStore.API.Core.Repository
{
    public class CategoryRepository : ICategoryRepository
    {
        private readonly GeeksStoreContext _context;

        public CategoryRepository(GeeksStoreContext context)
        {
            this._context = context;
        }
    }
}
Add following methods to CategoryRepository
GetAllAsync
This method gets all categories available in the database and returns them to the controller in the form of a list.
public async Task<List<Category>> GetAllAsync()
{
    return await _context.Set<Category>().ToListAsync();
}
GetAsync
This method accepts a integer parameter CategoryId and returns Category details.
public async Task<Category?> GetAsync(int? categoryId) { if(categoryId == null) { return null; } return await this._context.Categories.FindAsync(categoryId); }-
CreateAsync
This method accepts a Category object and inserts it into the database as a new Category, and returns a newly created Category to the client.
public async Task<Category< CreateAsync(Category category) { await this._context.AddAsync(category); await this._context.SaveChangesAsync(); return category; } -
DeleteAsync
This method accepts an integer parameter categoryId and deletes the category from the database.
public async Task DeleteAsync(int categoryId) { var category = await GetAsync(categoryId); if (category is null) { throw new Exception($"CategoryID {categoryId} is not found."); } this._context.Set<Category>().Remove(category); await _context.SaveChangesAsync(); } -
UpdateAsync
Updates Category values to the database as provided by the client/controller.
public async Task UpdateAsync(Category category)
{
    _context.Update(category);
    await _context.SaveChangesAsync();
}
-
APIController
The CategoryRepository is ready with all CRUD operations and can be used by the controller. Add a new API Controller with the name CategoryController to the folder Controllers.
CategoryRepository returns domain models to controller however controller should return specific data in form of DTOs, so to map domain models to DTOs we are going to use AutoMapper. For this you will have to create a MappingProfile. Please check for detailed steps about How to use AutoMapper in ASP.NET Core Web API
You can find all required DTO class definition here.
Create a constructor and inject dependency of AutoMapper and ICategoryRepository interface.
namespace GeekStore.API.Core.Controllers
{
    [Route("api/[controller]")]
    [ApiController]
    public class CategoryController : ControllerBase
    {
        private readonly IMapper _mapper;
        private readonly ICategoryRepository _categoryRepository;

        public CategoryController(IMapper mapper,
            ICategoryRepository categoryRepository)
        {
            this._mapper = mapper;
            this._categoryRepository = categoryRepository;
        }
    }
}
Add following CRUD operations that uses Category Repository.
GetAllCategories
Get the list of categories from Repository and return it to the client application. Notice that the controller is getting a list of Category domain models however it is returning a list of GetCategoryDetailsDto DTO.
Get list of category from Repository and return to client application. Notice that controller is getting list of Category domain model however it is returning list of GetCategoryDetailsDto DTO.
[HttpGet("GetAllCategories")]
public async Task<ActionResult<List<GetCategoryDetailsDto>>> GetAllCategories()
{
    var categories = await this._categoryRepository.GetAllAsync();
    var records = _mapper.Map<List<GetCategoryDetailsDto>>(categories);
    return Ok(records);
}
GetCategory
Get a single Category details
[HttpGet("GetCategory")]
public async Task<ActionResult<GetCategoryDetailsDto>> GetCategory(int categoryId)
{
    var category = await this._categoryRepository.GetAsync(categoryId);

    if (category == null)
    {
        throw new Exception($"CategoryID {categoryId} is not found.");
    }

    var categoryDetailsDto = _mapper.Map(category);

    return Ok(categoryDetailsDto);
}
CreateCategory
Create a new Category, HttpPost method.
[HttpPost]
public async Task<ActionResult<Category>>
    CreateCategory(CreateCategoryDto createCategoryDto)
{
    var category = _mapper.Map<Category>(createCategoryDto);

    await this._categoryRepository.CreateAsync(category);

    return CreatedAtAction("GetCategory", new { id = category.Id }, category);
}
UpdateCategory
This method updates a Category with required validation. This is the HttpPut method.
[HttpPut("UpdateCategory")]
public async Task<IActionResult>
    UpdateCategory(int categoryId, UpdateCategoryDto updateCategoryDto)
{
    if (categoryId != updateCategoryDto.Id)
    {
        return BadRequest("Invalid Category Id");
    }

    var category = await _categoryRepository.GetAsync(categoryId);

    if (category == null)
    {
        throw new Exception($"CategoryID {categoryId} is not found.");
    }

    _mapper.Map(updateCategoryDto, category);

    try
    {
        await _categoryRepository.UpdateAsync(category);
    }
    catch (Exception)
    {
        throw new Exception($"Error occured while updating CategoryID {categoryId}.");
    }

    return NoContent();
}
DeleteCategory
Call Category to delete Category having specific categoryId
[HttpDelete("DeleteCategory")]
public async Task<IActionResult> DeleteCategory(int categoryId)
{
    await _categoryRepository.DeleteAsync(categoryId);
    return NoContent();
}
-
Register Dependency of Repository
IoC container will create an instance of a repository depending on how you have registered it. A new instance of CategoryRepository will be required for every request to perform a unique operation so register it as AddScoped. Scoped instances are created once per request, for more details check Dependency Injection lifetime.
Add this code to program.cs file.
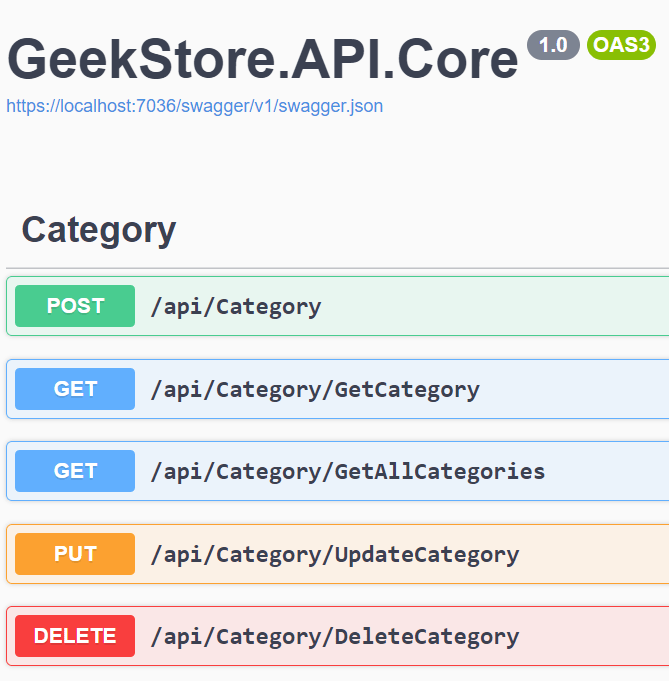
builder.Services.AddScoped
    <ICategoryRepository, CategoryRepository>();
Run your Web API application, you will see all CRUD operations listed by Swagger. You can test it using Swagger UI.

Blog Search

-
Building Scalable Applications: Microservice Architecture Challenges
-
The Paradigm Shift to Low-Code and No-Code Development in Software Engineering
-
How To Use AutoMapper in ASP.NET Core Web API
-
Generate Log using Serilog And Seq In ASP.NET Core MVC 6
-
How to Setup CORS Policies in ASP.NET Core Web API
Could you show how to test the CUD operations? Great article. Thank you!
How is tokens added to this structure?
How is tokens(security) added to this structure?
While adding data its showing An exception of type 'System.NullReferenceException' occurred in CustomerApp.dll but was not handled in user code Additional information: Object reference not set to an instance of an object.
While adding data its showing An exception of type 'System.NullReferenceException' occurred in CustomerApp.dll but was not handled in user code Additional information: Object reference not set to an instance of an object.
Sky, have you added line - static readonly ICustomerRepository repository = new CustomerRepository(); ?
@itortu - please check https://geeksarray.com/blog/testing-aspnet-web-api-core-using-postman to test your CRUD operations