

Every AWS API call, from launching a server to reading a log line, passes through one gate: Identity and Access Management (IAM). Get IAM right and the rest of your platform is secure by default. Get it wrong and no amount of firewalls or encryption will save you. That is why IAM comes before networking, containers or pipelines in this series.
This part explains how IAM decides yes or no, why roles should replace almost every access key you have, and how to give a CI pipeline deploy rights without storing a single AWS secret.
The four building blocks
IAM has a small vocabulary. Learn these four nouns and the documentation becomes readable.
- Principal — who is making the call. A human signed in through IAM Identity Center, an IAM user, an IAM role, or an AWS service acting on your behalf.
- Policy — a JSON document listing what is allowed or denied.
- Action — the API operation, written as
service:Operation, for examples3:GetObjectorecs:UpdateService. - Resource — the thing being acted on, identified by an ARN such as
arn:aws:s3:::my-bucket/*.
A policy statement ties them together: this principal may perform these actions on these resources, under these conditions.
How IAM evaluates a request
When a request arrives, IAM follows a fixed order. Memorise this; it explains almost every "access denied" you will ever debug.
- Default deny. Everything starts as denied.
- Explicit deny wins. If any applicable policy says
Deny, the answer is no, full stop. Not even anAllowelsewhere can override it. - Explicit allow. If no deny applies and at least one policy allows the action on the resource, the answer is yes.
- Guardrails cap everything. Service control policies from AWS Organizations, permission boundaries and session policies can only reduce what identity policies allow, never extend it.
So when a call fails, ask three questions in order: is there an explicit deny somewhere, is there an allow that matches both the action and the resource ARN, and is a guardrail cutting it off?
Identity policies versus resource policies
Most policies attach to an identity: "this role can read that bucket." Some services also support resource-based policies attached to the resource itself: "this bucket allows that role to read it." S3 buckets, ECR repositories, KMS keys, SQS queues and Lambda functions all support them.
Within one account, either kind is enough. Across accounts, you usually need both sides to agree: the caller's identity policy must allow the action, and the resource policy must trust the caller. This two-sided handshake is what makes cross-account deployment pipelines safe.
Why roles beat access keys
An IAM user with an access key is a long-lived password that never expires unless someone remembers to rotate it. Access keys get committed to Git, pasted into chat, baked into Docker images and left on laptops. Automated scanners find them on public GitHub within minutes.
An IAM role has no permanent credentials. A trusted principal assumes the role and receives temporary credentials that expire, typically within an hour. Roles are how:
- EC2 instances, ECS tasks and Lambda functions get permissions (instance profiles and task roles).
- Humans get admin or read-only access through IAM Identity Center.
- One account deploys into another.
- CI systems like GitHub Actions deploy to AWS without stored secrets.
The modern rule is simple: humans sign in through Identity Center, workloads use roles, and IAM users with access keys are an exception you have to justify.
Anatomy of a role
A role has two policies that do completely different jobs, and confusing them is the most common IAM mistake.
- The trust policy answers who may assume this role.
- The permission policies answer what the role may do once assumed.
A role for an ECS task, for example, trusts the ecs-tasks.amazonaws.com service and has a permission policy that lets it read one specific secret and write to one specific S3 prefix. Nothing more.
Least privilege in practice
"Least privilege" sounds abstract until you write a policy. Compare these two statements for a pipeline that pushes images to ECR:
{ "Effect": "Allow", "Action": "ecr:*", "Resource": "*" }
versus the version that only does what the job needs:
{
  "Effect": "Allow",
  "Action": [
    "ecr:BatchCheckLayerAvailability",
    "ecr:InitiateLayerUpload",
    "ecr:UploadLayerPart",
    "ecr:CompleteLayerUpload",
    "ecr:PutImage"
  ],
  "Resource": "arn:aws:ecr:ap-south-1:111122223333:repository/orders-api"
}
The first lets a compromised pipeline delete every repository in the account. The second can only push to one repository. Start from managed policies while you learn, then use IAM Access Analyzer to generate a tighter policy from the actions your role actually used over the last few weeks.
Deploying from GitHub Actions with OIDC
This is the pattern every modern AWS pipeline should use, and we will rely on it in part six. Instead of storing an access key as a GitHub secret, you let AWS trust GitHub's identity provider directly.
The flow works like this:
- You register GitHub's OpenID Connect provider (
token.actions.githubusercontent.com) in your AWS account once. - You create a role whose trust policy accepts tokens from that provider, but only for your repository and branch.
- In the workflow, GitHub issues a short-lived signed token; the AWS action exchanges it for temporary role credentials.
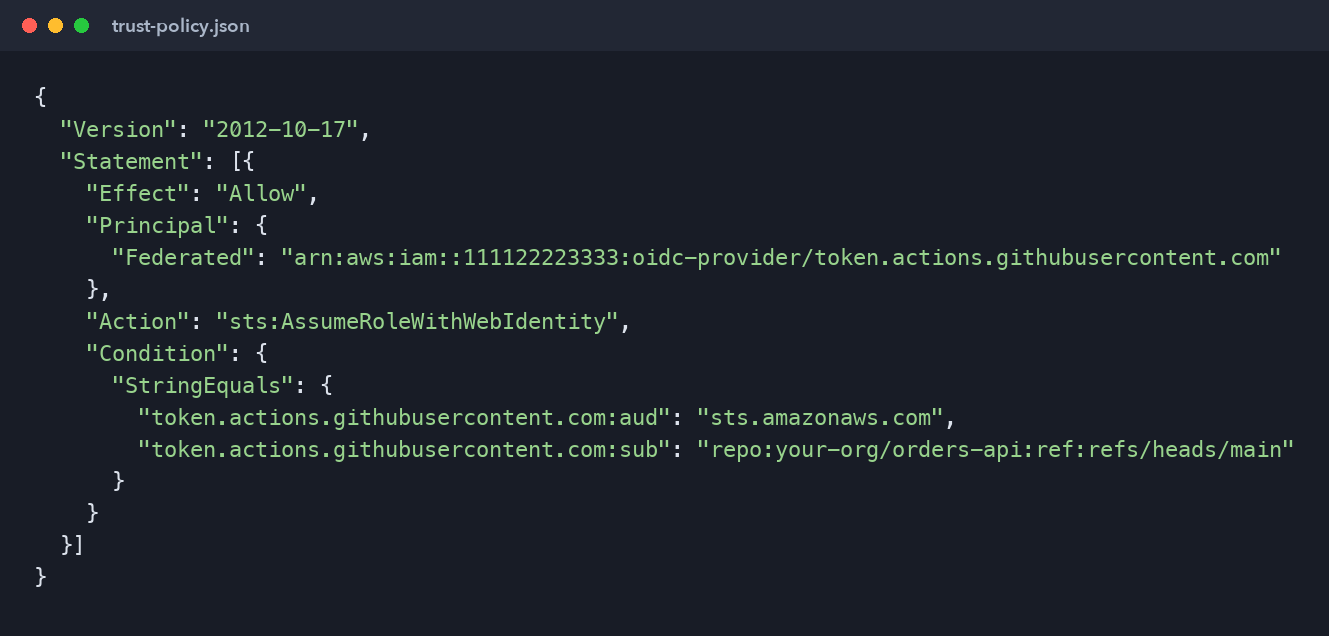
The trust policy is where the security lives:
{
  "Version": "2012-10-17",
  "Statement": [{
    "Effect": "Allow",
    "Principal": {
      "Federated": "arn:aws:iam::111122223333:oidc-provider/token.actions.githubusercontent.com"
    },
    "Action": "sts:AssumeRoleWithWebIdentity",
    "Condition": {
      "StringEquals": {
        "token.actions.githubusercontent.com:aud": "sts.amazonaws.com",
        "token.actions.githubusercontent.com:sub": "repo:your-org/orders-api:ref:refs/heads/main"
      }
    }
  }]
}
The sub condition is the critical line. Without it, any GitHub repository in the world could assume your role. With it, only workflows running on the main branch of your-org/orders-api can. You can use StringLike with a wildcard such as repo:your-org/orders-api:* to allow pull-request workflows, but keep production deploy roles pinned to a branch or a GitHub environment.
Guardrails worth adding early
Even on a small team, three guardrails pay for themselves:
- MFA everywhere for humans, enforced in Identity Center.
- A service control policy in your Organization that denies leaving approved regions and denies disabling CloudTrail. These protect you from both attackers and accidents.
- Permission boundaries on roles that developers can create, so a developer cannot grant a new role more power than they have themselves.
Debugging access denied
When something fails, work through this checklist before widening any policy:
- Run
aws sts get-caller-identityand confirm you are the principal you think you are. - Read the full error. Many services now name the exact action and the policy type that denied it.
- Check the resource ARN in your policy character by character, including region and account ID.
- Look for an explicit deny in SCPs, permission boundaries or resource policies.
- Use the IAM policy simulator to test the exact action against the exact resource.
The temptation is always to add "Action": "*" and move on. Resist it; a wildcard added during a late-night fix tends to survive into production for years.
Key takeaways
- IAM evaluates default deny, then explicit deny, then explicit allow, all capped by guardrails.
- Trust policies decide who assumes a role; permission policies decide what it can do.
- Roles with temporary credentials replace access keys for both workloads and pipelines.
- OIDC lets GitHub Actions deploy to AWS with zero stored secrets, as long as the
subcondition pins the repository and branch.
What's next
With identity sorted, part three builds the network your workloads will live in: a VPC with public and private subnets, route tables, NAT and security groups, and the reasoning behind each choice.
Comments (0)
No comments yet — be the first to share your thoughts.